Mar 13, 2026
Your Guide to the Stripe API Key and Bubble Integration
Learn how to find, manage, and securely use your Stripe API key in Bubble. This no-code guide unlocks seamless payments for your app.

So, you're ready to integrate payments into your Bubble app with Stripe. The first thing you'll need to get a handle on is your API keys. At its core, a Stripe API key is just a unique string of characters that lets your app securely talk to your Stripe account.
Think of it as the secret password that proves your app has permission to do things on your behalf—like charge a customer, set up a subscription, or pull a list of transactions.
What Is a Stripe API Key and Why Does It Matter
Before you can even think about connecting Stripe to Bubble, you have to understand what these keys are and the role they play. Your API key is the essential bridge between your application and Stripe’s massive payment processing network. Without it, your app is effectively shouting into the void; it has no way to tell Stripe to actually process a payment.
This link is what makes automating your business possible. It’s what empowers your no-code app development efforts to include sophisticated, secure financial features without writing a line of backend code.
Stripe's scale is enormous. As of early 2026, it powers payments for over 1.35 million live business websites and has been integrated into nearly 5 million sites historically. This widespread adoption is exactly why mastering its API keys is so crucial for any app builder—it’s the backbone of modern online commerce.
The Two Critical Key Types
Every Stripe account gives you two kinds of keys, and knowing which one to use (and where) is non-negotiable. Getting this wrong can either break your app or, far worse, create a massive security hole.
Publishable Key: This one is considered "public" and is safe to use in your app's frontend—the part that runs in a user's web browser. Its main job is to identify your account to Stripe and tokenize sensitive card details, so the actual card number never touches your server.
Secret Key: This is the key to the kingdom. It’s used exclusively on your server (in Bubble's case, in the secure backend settings) to authorize actual API calls. It can create charges, issue refunds, and access all your data. This key must always be kept private.
I always tell people to think of it this way: your publishable key is like the public address of your shop, while your secret key is the key to the safe in the back office. You only hand one of those out.
To make this crystal clear, here’s a quick breakdown of how these keys fit into your Bubble app.
Stripe API Key Types at a Glance
Key Type | Environment | Purpose | Where It's Used |
|---|---|---|---|
Publishable Key | Frontend | Identifies your account and creates secure payment tokens. | In your Bubble app's plugin settings or frontend workflows. |
Secret Key | Backend | Authorizes secure actions like charging cards or creating customers. | In the API Connector or plugin settings on Bubble's server-side. |
Webhook Signing Secret | Backend | Verifies that incoming webhook events are actually from Stripe. | In your backend workflow endpoints that listen for Stripe events. |
These keys work together to create a secure payment flow, ensuring sensitive data is protected while your app functions smoothly.
Test vs. Live Environments
Stripe does something brilliant by giving you two completely separate, parallel worlds to work in: Test mode and Live mode. Each of these environments has its own distinct set of publishable and secret keys.
This separation is your ultimate safety net. The Test environment is a full-featured sandbox. Here, you can use Stripe's test card numbers to simulate every possible transaction scenario—successful payments, declined cards, disputes—all without a single real dollar changing hands. This is your playground for building, testing, and debugging.
Once you’ve tested everything and are completely confident your payment logic is solid, you simply swap out the test keys for your Live environment keys. At that moment, your application goes from practice to reality, ready to process real payments from your customers. Getting this distinction right is the first and most important step toward building a professional-grade app.
How to Find and Generate Your Stripe API Keys

Alright, now that we've covered the what and why of API keys, let's get our hands dirty and actually find them. Stripe keeps this process pretty simple, but it's crucial to know exactly where you are—in the test or live environment—to avoid any mix-ups. We'll start in Test Mode, which is your personal sandbox for building and debugging without touching real money.
First, head over to your Stripe Dashboard. Look in the top-right corner for a switch labeled "Test mode" and make sure it's on. You'll know you're in the right place because a bright orange banner will appear at the top. This is Stripe's way of shouting, "Hey, you're just playing around with test data!" which is exactly what we want.
With Test Mode active, find Developers in the main menu on the left and then click on API keys. This page is your command center for all things related to your account's Stripe API keys.
Finding Your Test Keys
The API keys page will immediately show you the standard test keys. Your Publishable key, which always starts with pk_test_, is right there in plain text. You can just click it to copy it. Easy enough.
The Secret key is a different story. For your protection, Stripe keeps this hidden. You'll need to click the “Reveal test key” button to see it.
Pay Attention To This: Stripe only shows you a secret key once, right after it's created. If you navigate away or refresh the page, it's gone for good. You have to copy it and save it somewhere secure immediately.
Don't panic if you accidentally lose it or forget to copy it down. We've all been there. You can simply "roll" the key. This action will instantly revoke the old one and generate a fresh one for you to copy.
Getting Your Hands on Live Keys
Before you can get your live keys, Stripe needs to know who you are. You'll have to activate your account, which is a one-time setup where you provide your business details—think legal name, address, tax info, and the bank account where you want your money sent. This is a non-negotiable step for security and compliance, ensuring Stripe can legally transfer funds to you.
Once your account is activated, the process for finding your live keys is almost identical to what we just did for the test keys.
First, flip the “Test mode” toggle off. That bright orange warning banner will vanish, signaling you're now in the live environment.
Next, go right back to Developers > API keys.
This time, you'll be looking at your live keys. You'll see a Publishable key (starting with pk_live_...) and, once again, a hidden Secret key (starting with sk_live_...).
The same golden rule applies: reveal the live secret key, copy it instantly, and store it in a truly secure place, like Bubble's built-in secrets manager. A leaked live secret key can cause a world of financial pain, so treat it like the keys to your bank vault.
A Pro Tip for Staying Organized
Here’s a piece of advice I give everyone, especially if you're juggling more than one project. Instead of just using the default keys for everything, create restricted API keys. When you create a new key, give it a name that actually means something, like "Bubble MVP App" or "Marketing Site Integration."
Doing this makes it incredibly easy to see which key belongs to which app. More importantly, if one project is compromised or retired, you can revoke its specific key without disrupting any of your other live applications. It's a simple habit that will save you major headaches down the road.
Securely Connecting Your Stripe API Key in Bubble
Alright, you've got your test and live API keys from Stripe. Now for the fun part: getting your Bubble app and Stripe to talk to each other. This is how you'll actually start processing payments.
In Bubble, you have two main paths you can take. You can either use the powerful, flexible API Connector for full control or opt for a dedicated Stripe plugin that gets you up and running faster for common payment scenarios.
Let's break down both, starting with the API Connector.
Using the Bubble API Connector
Think of the Bubble API Connector as your direct line to Stripe's entire toolkit. It lets you make any custom API call you want, giving you complete control over your payment flows. This is the route to take if you're building complex subscription models, unique checkout experiences, or need to pull specific data that a pre-built plugin just doesn't offer.
When you're setting up a new API in the connector, the first and most critical step is authentication. This is how your app proves to Stripe it has permission to make requests.
Inside the API Connector, you'll configure the connection settings. For the Authentication dropdown, make sure you select "Private key in header." This tells Bubble to securely send your secret key with every server-side call.
Then, you have two fields to fill out:
Key name: This must be set to
Authorization.Key value: Here’s where your Stripe secret key goes, but with a crucial prefix. You have to type
Bearer(that's "Bearer" plus a space) and then immediately paste your key. The final value will look something like this:Bearer sk_test_....
This Bearer token is the standard way to present an API key, and getting it right is non-negotiable for the connection to work.
A mistake I see all the time is people pasting just the secret key into the value field, without the "Bearer " prefix. This will cause every single API call to fail with an authentication error. Always double-check that you've included it.
One of the best features in Bubble is how it handles different environments. In the API Connector settings, you can plug in your test key (in the "dev" field) and your live key. Bubble is smart enough to use the correct one depending on whether your app is in its development or live version.
This separation is fantastic because it lets you test your entire payment system from end to end without ever touching a real credit card. Building a reliable app is all about this kind of careful testing. For more foundational advice on app development, check out our guide on how to build a web application.
Choosing a Dedicated Stripe Plugin
If your payment needs are more straightforward—say, simple one-time charges or standard monthly subscriptions—a dedicated plugin can be a massive time-saver. The Bubble marketplace has several great options, but the official plugin built by Bubble itself is the most popular for a reason.
These plugins handle all the complicated API stuff for you. Instead of setting up API calls manually, you get simple, pre-built workflow actions like "Charge the current user" or "Subscribe the user to a plan." You just copy your keys into the plugin's settings page, and you're good to go.
So, which should you choose? Here’s a quick breakdown:
Feature | Bubble API Connector | Dedicated Stripe Plugin |
|---|---|---|
Flexibility | Total control over every API call. | Limited to pre-built actions. |
Setup Speed | Slower; requires manual setup for each call. | Very fast; just install and add keys. |
Best For | Custom payment flows, complex logic. | Standard payments and subscriptions. |
Learning Curve | Steeper; requires understanding the Stripe API docs. | Very gentle; uses intuitive workflow actions. |
The choice really depends on your project's scope. For a Minimum Viable Product (MVP), a plugin is almost always the fastest way to get started. As your app grows, you can always integrate the API Connector later to handle more advanced features. If you're curious about how other no-code platforms handle these integrations, you can find similar security principles in guides like this one for setting up Stripe Paid Memberships For Notion.
No matter which method you choose, you can rest easy knowing your integration can scale. Stripe processed an incredible $1.05 trillion in payments in 2023, all while maintaining 99.999% uptime. For a small business building on Bubble, this means your app can grow from a few sales a day to thousands without a hitch.
Using Webhooks for Real-Time Payment Automation
So, your user just successfully paid. The little green checkmark appears, and their card is charged. That's a great first step, but what happens next? How does your app know to unlock that new feature, send a welcome email, or update their account status?
Constantly asking Stripe "Is it done yet?" is wildly inefficient. This is where webhooks come in. Think of a webhook as a direct line from Stripe to your app. Instead of you polling for updates, Stripe proactively sends a notification—an automated message—to your app the instant an event occurs.
This real-time communication is the secret sauce for building a responsive, automated application that feels seamless to your users.
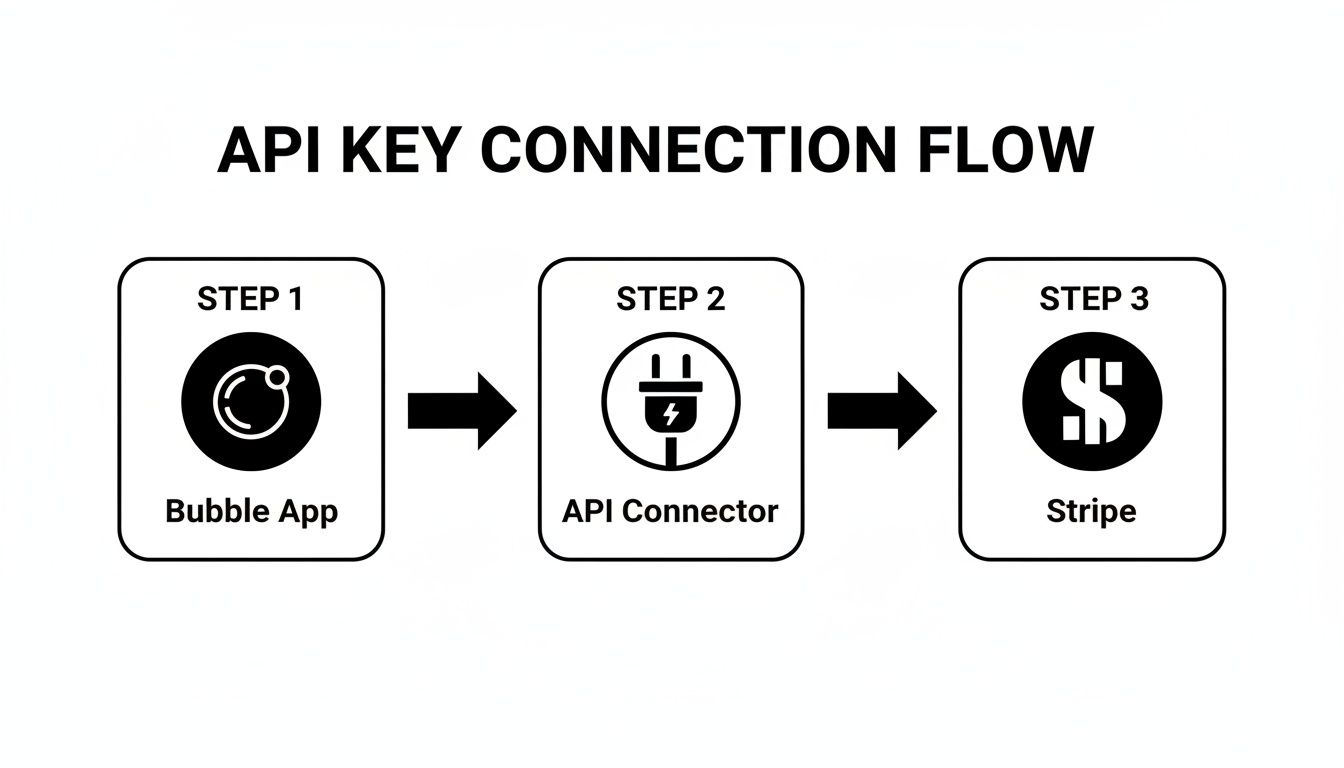
This diagram shows how your Bubble app, the API Connector, and Stripe all talk to each other, with the API key acting as the secure bridge for that communication.
Creating Your Webhook Endpoint in Bubble
To catch these notifications from Stripe, you need to set up a dedicated "listening post" within your Bubble.io app. You'll do this by creating a new API workflow in your app's backend.
When you set up this new backend workflow, there are a few key settings you'll need to configure:
Expose as a public API workflow: This is what makes the endpoint reachable by Stripe.
This workflow can be run without authentication: Stripe's pings won't be logged in as a specific user, so this setting is essential for the endpoint to work correctly.
Detect request data: This is a critical one-time step. It puts Bubble in "listening mode" to figure out the exact structure of the data Stripe sends over.
Once you click to initialize detection, Bubble will generate a unique URL for this endpoint. Copy it. Now, pop back over to your Stripe Dashboard and navigate to Developers > Webhooks. Here, you'll add a new endpoint, paste in your Bubble URL, and choose which events you want to be notified about. A classic one to start with is payment_intent.succeeded.
Think of it like giving Stripe a special, private phone number for your app. When a payment goes through, Stripe dials that number to deliver a detailed message, which your Bubble backend workflow is waiting to pick up.
You'll need to trigger a test event from the Stripe dashboard. This sends a sample notification to your Bubble URL, allowing Bubble to "detect" and map out the data structure. From that point on, you can build powerful workflows. For instance, when that payment_intent.succeeded event arrives, you can have a workflow step that finds the matching user in your database and flips their Account_Type from "Free" to "Premium."
The Critical Role of the Webhook Signing Secret
Okay, let's talk about the single most important part of this whole process: security.
How can you be 100% sure the message hitting your endpoint is actually from Stripe? What's to stop a bad actor from sending a fake "payment succeeded" message to your endpoint to trick your app into giving them free access? The answer is the webhook signing secret.
Every time you create a new webhook endpoint in Stripe, it generates a unique secret key for you. It'll start with whsec_.... This key is used by Stripe to create a cryptographic signature for every single webhook notification it sends out. It’s like a digital fingerprint that's unique to that specific message.
Your job is to verify this signature on every request that comes in. Inside your Bubble backend workflow, you’ll paste this signing secret into the appropriate settings. Bubble then automatically handles the validation. If the signature on an incoming message is valid, you know it's genuinely from Stripe and you can trust the data. If the signature is invalid, you must reject it.
Let me be clear: skipping this step is not an option. Verifying webhook signatures is the only way to guarantee your payment automations are secure and to protect your app from fraudulent activity. It's a non-negotiable step for any serious application.
Essential Security Practices for Your Stripe Keys

Let's be blunt: treating your Stripe API secret key like anything less than your bank account password is asking for trouble. A compromised key is a direct line to fraudulent charges, stolen customer data, and a complete meltdown of the trust you've built. This section is about adopting a security-first mindset—it's what separates a hobby project from a professional, secure application.
The absolute first rule, and this is non-negotiable, is to never hard-code your Stripe API key anywhere on the front end or in your Bubble.io workflows. Exposing it in your app's code is like leaving your house keys under the doormat. It’s just too easy for someone to find.
Instead, always use Bubble’s built-in secrets management. Whether you're using the API Connector or a plugin, there will be a designated field for your private keys. This ensures the key is encrypted and stored safely on the server, totally inaccessible from the client side.
Proactive Defense with Key Rotation
Even when you're careful, keys can leak. Accidents happen. That’s why a smart, proactive defense is to get into the habit of key rotation. It’s a simple practice: you periodically revoke your old API key and generate a fresh one to take its place.
You don't need to wait for a security breach to do this. Making it a regular task—maybe once a quarter or every six months—dramatically shrinks the window of opportunity for a lost or forgotten key to be used against you.
Rolling a key in your Stripe Dashboard is instantaneous. The old key gets deactivated immediately, and a new one is created. All you have to do is copy the new key and paste it back into your Bubble app's secrets manager. It’s a five-minute job that gives you a massive security upgrade.
I treat my API keys like important passwords. If I can't remember the last time I changed one, it's already overdue. This simple mental model helps me maintain a strong security posture without overthinking it.
Minimize Your Risk with Restricted Keys
Not every part of your app needs full administrative power over your Stripe account. Your standard secret key can do everything, but Stripe lets you create restricted API keys with limited permissions. This is a powerful way to implement the principle of least privilege—a core security concept.
For example, maybe you're building a dashboard for your support team that only needs to look up a customer's billing history. Instead of using your main secret key, you can generate a restricted key with only "Read" permissions for customer and subscription objects.
That way, even if that specific key were somehow compromised, a bad actor couldn't use it to create charges, issue refunds, or access sensitive payment information. The potential damage is effectively contained.
To create one, just head to the API keys section in your Stripe Dashboard. Instead of grabbing the standard key, click to create a new restricted key. You’ll see a menu of permissions where you can check off exactly what that key should be allowed to do.
Common use cases for restricted keys include:
Analytics Dashboard: A key with read-only access to transactions and customer data.
Customer Support Tool: A key that can read customer info and perhaps update metadata, but cannot create payments or refunds.
Third-Party Integration: If you connect another service to your Stripe account, give it a dedicated key with only the permissions it absolutely requires to function.
By combining secure storage in Bubble, regular key rotation, and the strategic use of restricted keys, you build multiple layers of defense around your entire payment infrastructure.
Common Questions About Using Stripe API Keys
When you first start wiring up Stripe to a Bubble app, a few questions always seem to come up. Let's walk through some of the most common sticking points I see with founders and builders getting their payment systems online.
Can I Use the Same Stripe API Key for Multiple Apps?
Technically, you can. But you absolutely shouldn't. Using the same key across different projects is a major security flaw and just bad practice all around.
The smart move is to generate a completely new set of API keys for every single application you build. This keeps everything isolated. If one app's key ever gets compromised, the rest of your projects—and their revenue—stay safe and sound. You can manage everything from one Stripe dashboard, so there's really no good reason to take the risk.
Think of it like this: you wouldn't use the same password for your email, your bank account, and your social media. A single leak would be a disaster. Treat your API keys with the same level of care.
What Happens If I Accidentally Expose My Secret Key?
If you have even the slightest suspicion that your secret key has been exposed, you need to act fast. Don't wait.
Go directly to your Stripe Dashboard and navigate to Developers > API keys. Find the key you're worried about and "roll" it. This action immediately deactivates the old key and generates a brand-new one for you. Grab that new key and update it in your Bubble app’s secrets manager immediately to avoid any disruption in service. A quick response here is your best defense against unauthorized charges or fraud.
Why Is My Test Key Not Working for Real Payments?
This is a classic point of confusion, but it's actually Stripe working exactly as intended. Your test keys and live keys exist in two entirely separate universes. They are completely sandboxed from each other.
Your test key, which starts with sk_test_..., is designed to work only with Stripe's specific test card numbers, like the famous 4242 4242 4242 4242. It's physically impossible to process a real payment with it.
To start accepting actual money from customers, you have to swap in your live keys (the ones that start with pk_live_... and sk_live_...) in the live version of your Bubble app. You'll only be able to do this after you've fully activated your Stripe account by submitting all your business and banking information. If you're running into issues here, getting some dedicated Bubble.io help can often clear up these common integration hurdles.
Feeling stuck on a specific Stripe integration or another Bubble challenge? With Codeless Coach, you get one-on-one expert guidance to solve your exact problems, saving you weeks of frustration. Book a session today and build your app faster. Learn more at https://codeless.coach.


