Mar 4, 2026
Launch Your MVP with a No Code AI App Builder
Learn to launch your MVP fast with a no code AI app builder. This guide covers connecting to OpenAI, designing workflows, and shipping your app without code.

A no code AI app builder is essentially a platform, like Bubble.io, that gives you the power to build full-blown applications with artificial intelligence baked right in—all without touching a single line of code. You get to visually design your app and then connect it to powerful AI services, like OpenAI, to handle the "smart" stuff.
The New Reality of No Code AI App Development
Not too long ago, the very idea of building an app with AI features felt out of reach unless you had a team of specialized developers and a hefty budget. That’s just not the case anymore. The barriers have come down, thanks entirely to the rise of the no code AI app builder.

This is a real, practical shift in how software gets made. It all boils down to two key pieces of technology working together:
Visual Development Platforms: Think of tools like Bubble.io. They give you a visual canvas to drag and drop elements, map out user workflows, and design your entire interface. This is the body of your app—what your users actually see and click on.
AI-as-a-Service APIs: This is where the magic happens. Companies like OpenAI do the incredibly heavy lifting of creating and training massive AI models. Then, they let you "rent" that brainpower through a simple connection called an API. It's how you give your app the ability to write content, analyze data, or even hold a conversation.
Why This Combination Is a Game-Changer
Putting these two things together is what makes building a no-code AI app a reality. You build the app's structure and user experience in Bubble, then use its API Connector to plug into an AI's brain. It’s like building a custom PC—you’re not manufacturing the processor yourself, you're just selecting the right one and plugging it into the motherboard.
This approach massively cuts down on development time, especially when you're just trying to get a Minimum Viable Product (MVP) out the door. Instead of spending months coding something from scratch, founders can test and validate an idea in a matter of weeks. You can check out our guide on https://codeless.coach/blog/whats-an-mvp to see how to narrow your focus for a faster launch.
The real impact here is that non-technical founders and creators are no longer limited to building simple websites. They can now create genuinely intelligent tools with real analytical and generative power—something that used to be completely gated behind knowing how to code.
The ability to create a No Code Chatbot, for instance, has become incredibly accessible, opening up AI development to a much wider audience.
The Market Is Responding
And this isn't just a niche trend for hobbyists. The market for these platforms is exploding, which points to a fundamental change in how businesses are adopting AI.
The global no-code AI platform market was valued at $6.56 billion in 2025 and is on track to hit a staggering $75.14 billion by 2034. This kind of growth shows that companies of all sizes are jumping on board, realizing they can integrate sophisticated AI without having to hire huge, specialized engineering teams. For a deeper dive, you can read the full research on the no-code AI platform market.
How to Strategically Plan Your AI App MVP
I can't stress this enough: before you even think about opening a no code AI app builder like Bubble, the most important work happens away from the screen. Grab a notebook or get in front of a whiteboard. A clear, focused plan is your single best defense against wasted weeks and a bloated, confusing app. Your goal here is to define a Minimum Viable Product (MVP) that you can actually build and that offers real value right out of the gate.

The biggest temptation is to build every single feature you've ever dreamed of. Resist it. Instead, you need to find the one core, AI-driven feature that solves the most painful problem for your users. Getting this right is what lets you launch fast and start learning.
This isn't just a gut feeling; it's a proven strategy backed by data. No-code is no longer a niche hobby. In fact, low-code or no-code development now drives 65% of all app development activity across businesses. You can see more compelling app development statistics at SQ Magazine. This massive shift confirms that starting small and focused with a no-code MVP isn't cutting corners—it's just smart business.
Nail Down Your Core AI Function
Let's walk through a practical example. Imagine you want to build a "Smart Trip Planner." The grand vision is huge: flight and hotel booking integrations, live traffic alerts, restaurant reservations... the works. That's great for version 3.0, but for an MVP, we need to zoom way in.
What's the one thing that provides immediate value? It's the custom travel itinerary. That’s it. We’re not booking flights. We’re not finding hotels. We are simply taking a user's request and using AI to generate a fantastic, personalized plan.
Key Takeaway: Your MVP needs a single, powerful "wow" moment. For our trip planner, it's that magical experience of turning a few simple inputs into a complete, thoughtful itinerary in seconds.
This clarity simplifies everything. You suddenly know exactly what to build, what questions to ask the user, and what to tell the AI to do. This thinking process is a fundamental part of prototyping an app before you build and saves so much headache later on.
Map the User Journey and Data Flow
Once you’ve locked in that core function, you can start sketching out the user's path and how data will move through your app. This is basically a blueprint for your workflows in Bubble.
For our Smart Trip Planner, the flow looks something like this:
User Input: The journey begins with a simple form where the user gives us the essentials.
Destination: "Paris, France"
Trip Length: "5 days"
Travel Style: "Relaxed, focused on art and food"
Budget: "Mid-range"
API Call: Your Bubble app takes this info, bundles it into a well-structured prompt, and sends it over to the OpenAI API. You're essentially translating the user's wishes into a language the AI understands.
AI Processing: The AI model gets the prompt and works its magic, creating a detailed itinerary based on the instructions you've carefully engineered.
Display Output: Finally, the AI sends the finished itinerary back to your app. Your job is to catch that response and present it to the user in a clean, easy-to-read format.
Plan Your Database Structure
Even the simplest MVP needs a place to store information. In Bubble, this means thinking through your database "Things" ahead of time. For our trip planner, we can start with just two main data types. It's all we need.
Data Type | Fields to Store | Purpose |
|---|---|---|
User |
| This is Bubble's standard way to handle accounts and connect users to their own content. |
Itinerary |
| This saves every trip plan, so users can come back and see their saved results. |
That’s it. This basic structure supports user sign-ups and saves the valuable output your AI creates. By planning this out on paper first, building it in the Bubble editor becomes a logical, step-by-step process instead of a chaotic guessing game.
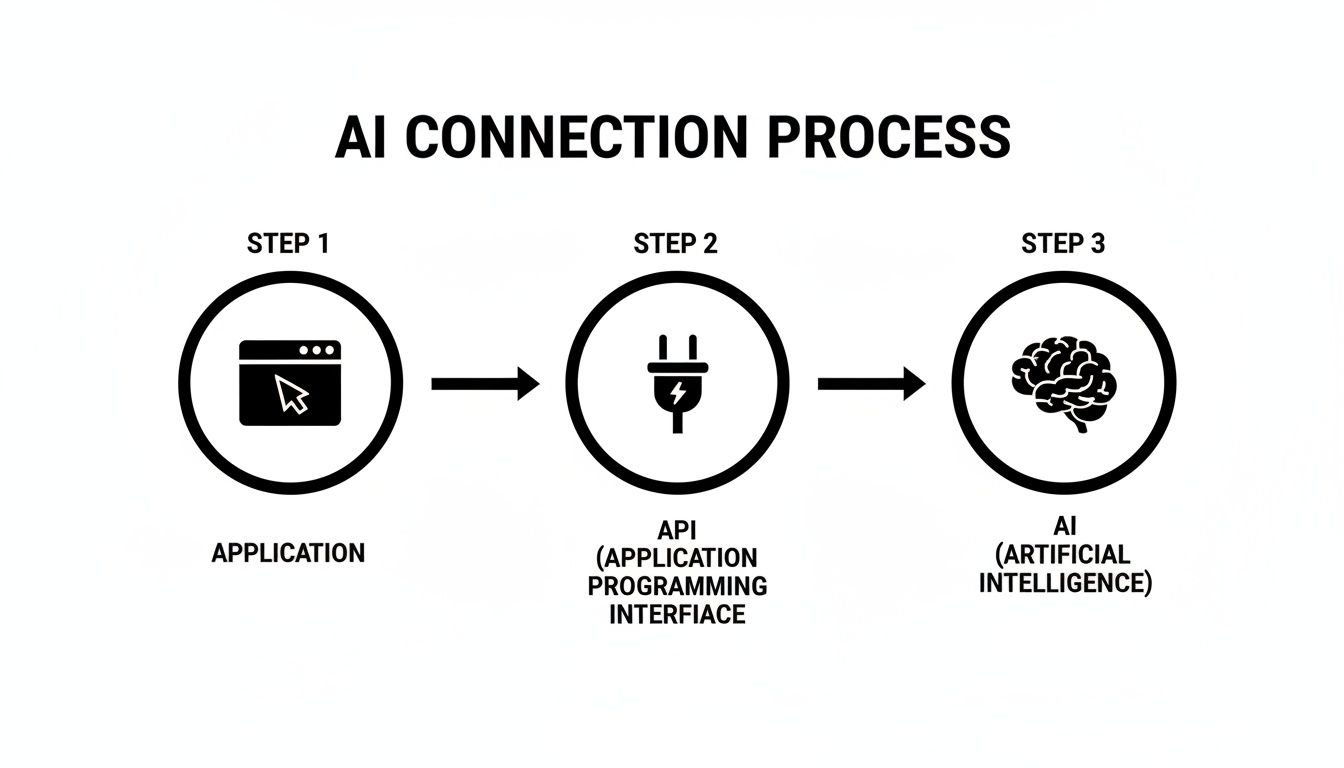
Alright, you've got your MVP mapped out. Now for the fun part: giving your app its intelligence. This is where we hook up your Bubble interface directly to an AI model like OpenAI's GPT series. Think of it as connecting a powerful, external brain to your app's body.
This whole process hinges on Bubble's fantastic API Connector plugin. If you're new to APIs (Application Programming Interfaces), just imagine a waiter at a restaurant. Your app is the customer who places an order (the prompt), the API is the waiter who takes that order to the kitchen (the AI model), and then brings back the finished dish (the AI-generated text).
Securing Your API Keys
First things first: you need a key to get into the "kitchen." An API key is a secret code you get from your AI provider—in this case, from your OpenAI account dashboard. It proves that it’s really your app making the request.
You have to treat this key like your bank account password. If it gets exposed, anyone can use it, and you'll be footing the bill. Never, ever put it in a place where your users' browsers can see it.
Thankfully, Bubble has a secure, server-side way to handle this. Head over to your OpenAI account's API section and generate a new secret key. Copy it right away, because they won't show it to you again.
Now, in your Bubble editor, go to the Settings tab, then General, and find the option to "Enable app-wide private key storage." Check that box. A new field will pop up, which is where you’ll paste your secret key. Here’s a crucial detail: you need to type Bearer (with a space after it) right before you paste the key. This is just part of the standard authentication format.
Configuring the API Connector
The API Connector is the swiss-army knife for any no-code AI app builder. If you haven't already, find it in Bubble's plugin marketplace and install it.
After installing, this is the blank slate you'll be working with.
This clean interface is where you'll teach your app how to talk to the AI.
Let's get it set up. Add a new API, name it something clear like "OpenAI," and then configure your first API call. To connect to OpenAI's newer models, you’ll be setting up a POST request. This just means you're sending data to be processed.
For this call to work, you have to define a couple of things:
Headers: This is just some metadata for the request. You'll need two of them. One is
Content-Type, which should have the valueapplication/json. The other isAuthorization, where you'll simply use the private key you just securely stored.JSON Body: This is the important part—the actual "order" you're sending to the AI. It’s a block of structured text containing your prompt and other instructions.
Crafting the Dynamic JSON Body
The heart of your API call is its JSON body. This is where you tell the AI exactly what you want it to do. For a chat model, the structure usually involves specifying the model (like "gpt-4o") and a messages array.
But you can't just type a static prompt here. The whole point is for the app to be interactive! This is where dynamic values come in. In the JSON body, you can create a placeholder by wrapping a word in angle brackets, like <prompt>.
{
"model": "gpt-4o",
"messages": [
{
"role": "system",
"content": "You are a helpful assistant."
},
{
"role": "user",
"content": ""
}
]
}
By creating that <prompt> placeholder, Bubble automatically turns it into an input field when you use this API call in a workflow. This is how you pass whatever your user types in a text box directly to the AI.
Initializing the Call and Setting It Up for Workflows
Once you've structured the JSON, you have to initialize the call. This is a mandatory test run. Bubble takes what you've written and sends a real request to OpenAI. If it works, Bubble inspects the response and maps out all the data fields for you, making them usable in your app.
Expert Tip: Don't just click "Initialize" and move on. Actually look at the data structure that Bubble shows you. You'll quickly learn that the AI's response isn't just a simple piece of text; it's often buried deep inside a path like
choices[0].message.content. Knowing this exact path is essential for actually displaying the result to your user.
After a successful initialization, you have one more critical step. Change the "Use as" dropdown from "Data" to "Action." This is a small click with huge implications.
A Data call is for pulling in information to display on a page load, like a static list.
An Action call can be triggered by a user, like when they click a "Generate" button. This is exactly what we need.
By setting it as an "Action," this OpenAI call you just built becomes a new, powerful block that you can drop into any workflow. You’ve officially bridged the gap between Bubble and a world-class AI. Next, we'll build the workflows that put it to work.
Designing Your UI and Core AI Workflow
Alright, so you’ve successfully plugged your app into an AI "brain" like OpenAI. Now for the fun part: building the actual interface your users will see and interact with. This is where a no code AI app builder like Bubble.io really shines. After all, even the most powerful AI is useless if people can't figure out how to use it.
The first thing you have to think about is how your app will look on different devices. People will be using it on everything from a massive desktop monitor to a tiny phone screen. This is where Bubble's Responsive Engine comes in clutch. It lets you set rules for how your app's elements should automatically resize, stack, or rearrange themselves. A great habit to get into is designing for mobile screens first, then working your way up to larger sizes.
Building the Essential UI Components
For our "Smart Trip Planner" example, we can get a working MVP up and running with just a few basic elements. Keeping it simple is the fastest way to get your idea out there.
To build the front-end, you'll need to drag and drop a few key components onto your Bubble page. This table breaks down what you'll need and why.
UI Element | Type | Purpose in AI App |
|---|---|---|
Description Box |
| Gives users ample space to describe their ideal trip in detail. |
Generate Button |
| The main trigger that initiates the AI workflow when clicked. |
Response Area |
| Displays the final, AI-generated travel itinerary for the user. |
Container |
| A container to hold the Text element, making it easier to manage visibility and styling. |
With just these four elements, you have everything required for a user to submit a request and see the AI's response. It’s a beautifully simple setup.
This diagram illustrates what's happening behind the scenes: your app's UI captures the user's request, sends it to the AI through the API, and then displays the answer that comes back.
Think of your app as the essential middleman, translating a user's click into a sophisticated conversation with an AI model.
Creating Your First AI-Powered Workflow
Now, let's make those UI elements actually do something. In Bubble, all the action happens in the Workflow Editor. Find your "Generate Itinerary" button and click "Start/Edit workflow." You're now looking at a blank canvas where you'll tell Bubble exactly what to do when that button is pressed.
The workflow itself is surprisingly straightforward. Your first step is to trigger the OpenAI API call you just set up in the API Connector. When you add this action, you'll see that dynamic <prompt> field we created earlier. All you have to do is link it to the value from your Multiline Input element. Just like that, you're passing the user's trip description directly to the AI.
Once the API call is done, you need to show the result. Add a new action—you'll find it under Element Actions > Display data. Pick the Text element you designated for the itinerary. For the "Data to display" field, you'll point it to the output from the previous step.
Crucial Insight: The data from the AI rarely comes back as simple text. You'll need to dig into the response structure to find what you need. The path usually looks something like
Result of step 1 (OpenAI - Call)'s choices's first item's message content. Getting comfortable with navigating these data paths is the key to making everything work.
This is the basic logic: grab input, send to AI, display output. But we can—and should—add one more layer to make the experience feel much more professional.
Improving User Experience with a Loading Indicator
AI models aren't always instantaneous. A complex request might take a few seconds to process. If a user clicks your button and the screen just sits there, they'll probably assume your app is broken and leave. We need to give them some feedback.
A simple loading indicator is the perfect way to do this. You can use an animated icon or even just a text element that says "Generating..." Place it on the page, but in the element's properties, make sure to uncheck the box for "This element is visible on page load."
Now, let's tweak your workflow to use it. It's a simple 4-step sequence:
Show Loading Indicator: Right before your API call, add an action to make your loading element visible.
Call the AI API: This is your existing OpenAI action that does the heavy lifting.
Display the AI Response: Your existing action that shows the generated itinerary in the text box.
Hide Loading Indicator: As the very last step, add an action to hide the loading element again.
This small addition completely changes the feel of your app. It goes from feeling uncertain to communicating clearly what's happening. The user knows the app is working, which makes the wait feel intentional. These are the little details that separate a quick prototype from a polished product.
So, you’ve managed to connect your app to an AI model using the API Connector. That’s a massive step, but now comes the real challenge: getting the AI to give you a great response every single time. This is where prompt engineering comes in.
It’s one thing to get a simple block of text back from the AI. It's another thing entirely to coax it into providing a response that's perfectly formatted, consistently useful, and ready for your app to use without a hitch. This skill is what turns a fun experiment into a genuinely powerful tool. Before we get into the advanced stuff, make sure you have a solid grasp of what a prompt is and how it works as your instruction to the AI.
Give the AI a Persona with System Messages
One of the easiest and most powerful tricks in the book is to use a "system" message. Think of it as giving the AI a job description before you give it a task. Inside the JSON body of your API call, you can assign the AI a specific role, which sets the entire context for the conversation and dramatically improves its answers.
For our "Smart Trip Planner" app, you could add a message where the role is system and the content is something like this: "You are a world-class travel agent who creates personalized and exciting itineraries. You are friendly, helpful, and provide detailed, practical suggestions."
Just by adding that one instruction, you're framing every single user request that follows. The AI now knows how to behave, leading to much better, more on-brand results.
Show, Don't Just Tell: Using Examples for Precision
Sometimes, telling the AI what you want isn't quite enough. You have to show it. This technique is often called few-shot prompting, and it’s a fantastic way to train the AI on the exact output format you need. You simply provide a few examples of input and the corresponding desired output right in your prompt.
Let's say you want your trip planner to include an emoji with each activity. Your prompt could include a quick example like this:
User Input: "Plan a 3-day trip to Rome focusing on history."
Example Output: "Day 1: 🏛️ Visit the Colosseum in the morning..."
By feeding it this small example, the AI immediately picks up on the pattern. It learns the format you’re looking for and applies it to the actual user's request, giving you predictable, well-formatted results without needing to write complex code to add those emojis later.
This kind of fine-tuned control is becoming incredibly important. The entire AI industry is exploding with investment, and competition is heating up. In fact, total worldwide AI spending is on track to hit $2.52 trillion in 2026. More relevant to us, the market for AI code tools—which absolutely includes no-code platforms—is projected to jump from $4.86 billion in 2023 to $26.03 billion by 2030. This growth is a huge signal that the skills you're learning right now are incredibly valuable.
Mastering prompt engineering isn't just a neat trick; it's one of the most essential skills in modern app development. It's the human touch that transforms a powerful technology into a truly useful product.
The Ultimate Trick: Requesting Structured JSON Output
Now for what I consider a true game-changer: asking the AI to give you its response as a structured JSON object. This is how you go from displaying a simple wall of text to working with clean, organized data inside Bubble.
You can do this directly in your system prompt. Just add an instruction like: "Please provide the output as a valid JSON object. The object should contain a list of days, where each day has keys for 'day_number', 'morning_activity', and 'afternoon_activity'."
When the API returns a neat JSON string, you can use Bubble’s built-in :parsed as JSON operator. This instantly turns the text into data fields you can actually work with. Suddenly, you can pull the morning_activity into one text element and the afternoon_activity into another. You can save each piece to different fields in your database.
This gives you surgical control. You’re no longer just displaying text; you're receiving structured data that your app can understand and manipulate. This opens the door to creating dynamic repeating groups, building charts, or triggering other workflows all based on the AI's response. It’s how you make your AI integration robust, scalable, and truly professional.
From Project to Product: Testing, Deployment, and Getting Expert Help
You’ve done it. The UI is sharp, the workflows are humming, and your AI integration is working. It’s an amazing feeling, but don't pop the champagne just yet. Now comes the part that separates a fun project from a reliable, real-world application: testing, deploying, and knowing where to turn when you hit a wall.
Let’s be honest—your first goal in testing should be to break your own app. I mean it. Be relentless. For any app using a no-code AI app builder, the most common weak point is the API call to your AI model. What happens if OpenAI's API is slow or your request just times out? The last thing you want is a blank screen or a crashed app. It needs to handle these hiccups with grace.
Hunting for Bugs and Handling Errors
When something inevitably goes wrong, Bubble's server logs will become your go-to detective tool. You can see the entire history of your app's API calls—the exact data you sent and the raw, unfiltered response that came back. If a workflow is acting up, this is always the first place I look. Did the AI return a cryptic error message instead of that beautiful travel itinerary? The logs will have the answer.
But finding bugs is only half the battle; you need to anticipate them. You can build this resilience directly into your Bubble workflows.
Use an "Only when..." condition: Add a step that only triggers if the previous API call resulted in an error.
Show a helpful message: Don't just fail silently. Display something clear and reassuring like, "Sorry, our AI is a bit busy right now. Please try again in a moment."
Log the error for yourself: I often set up a workflow to create a new entry in a database table called "API Errors." This logs the details so I can review them later without the user ever knowing something went wrong.
This kind of proactive error handling is what makes an app feel polished and professional. It builds trust, even when the tech behind the curtain is having a bad day.
Going Live and Watching Your Costs
Once you've squashed the major bugs and you’re confident in the app's stability, it’s go-time. Deploying on Bubble is famously simple—you literally just click a button to push everything from your test version to your live domain. But with an AI-powered app, you have to keep performance and cost in mind from day one.
Bubble runs on a "workload" system, which is essentially a measure of your app's server consumption. API calls, especially ones that handle a lot of data or complex requests, are workload-intensive. If your app suddenly gets popular, you can see those costs add up fast.
It's not a matter of if, but when you'll need to upgrade your Bubble plan. Start monitoring your workload consumption right from the launch. As you get more users, you'll need more server power to keep the app snappy and responsive.
This isn't a scary thing; it's just the business side of a successful app. Your two biggest scaling costs will almost always be your Bubble workload and your AI provider's API fees. Plan for them.
Knowing When to Raise Your Hand
No matter how experienced you are, you will get stuck. It’s a rite of passage. You might burn an entire weekend trying to figure out why an API response won't parse correctly or why a specific responsive setting is breaking your layout. Frustration is normal, but letting a single problem derail your project for weeks isn't.
This is where targeted, one-on-one help can be a lifesaver. I've seen it time and time again: a 60-minute call with an expert can solve a problem that's been holding you back for days. Whether you're fighting a tricky API connection or just need a second pair of eyes on your database structure, getting help is an investment in your own momentum.
Building with no-code tools is incredibly empowering, but you don't have to go it alone. If you want to see how this can work for you, check out what it takes to get specific Bubble.io help and launch your app faster.
Common Questions on Building AI Apps Without Code
Diving into no-code AI for the first time usually sparks a ton of questions. It's a new frontier for many builders. Let's tackle some of the most common ones I hear from people just getting started with a no-code AI app builder.
What Can I Actually Build with This?
You can build an incredible range of apps. The trick is to stop thinking about building an AI from scratch and start thinking about building a smart, custom interface for a powerful, pre-trained AI like the models from OpenAI.
Some of the most popular projects I see people create are:
Custom Content Generators: Think tools that whip up marketing copy, blog outlines, or social media posts based on a user's specific needs.
Intelligent Data Sifters: Apps that can read and understand uploaded text—like a pile of customer reviews—to pull out key themes and give you a summary.
Specialized AI Chatbots: Not just a generic bot, but one you've trained on your own documents to answer specific customer questions or walk users through a complex process.
Smart Recommendation Engines: Ever used an app that just gets you? You can build one that suggests products, movies, or anything else based on a user's tastes and history.
Honestly, if you can imagine an AI performing a task through an API, you can almost certainly build a unique front-end for it using a platform like Bubble.io.
How Much Is This Going to Cost Me?
When you're budgeting for your no-code AI app, you really have two main costs to keep an eye on.
First, there's your no-code platform subscription. For something like Bubble, plans are priced based on the server resources your app uses, which they call "workload." More users and more complexity mean a higher workload.
Second, you'll have the usage-based bill from your AI provider. OpenAI, for instance, charges by the "token," which is essentially a piece of a word. Every request you send and every response you get back adds to your token count.
For a new app or an MVP with light traffic, your total costs can be surprisingly low. But you have to plan for success. As your user base grows and API calls become more frequent, both your Bubble plan and your AI bill will climb. My best advice? Monitor your usage from day one.
Is Connecting an AI API to Bubble Actually Hard?
This is the part that intimidates most non-technical founders, but connecting an AI to Bubble with the API Connector plugin is way more manageable than you might think. No, you absolutely do not need a background in programming.
You will, however, need to get comfortable with a few key concepts. The whole process really boils down to:
Grabbing your secret API keys from your AI provider's dashboard.
Setting up the API call headers in Bubble to authenticate yourself.
Structuring the JSON body of your request, which is just a specially formatted text that includes your user's prompt and any other instructions for the AI.
Once you’ve set up and tested the connection, Bubble treats that API call like any other native feature. You can drop it right into a workflow, trigger it with a button click, and reuse it all over your app. It just becomes another tool in your toolbox.
Ready to stop wondering and start building? At Codeless Coach, we offer one-on-one, hands-on tutoring to help you master Bubble, hook up any AI, and get your app launched. Book a session and let's solve your specific challenges together.


