
Apr 9, 2026
Multi File Upload in Bubble: A Practical Guide
Learn how to add multi file upload to your Bubble.io app. This practical guide covers plugins, UI design, backend workflows, large files, and security.

You’re probably building one of these right now.
A client portal where users need to send contracts, invoices, and ID documents in one go. A marketplace where freelancers upload a portfolio set instead of a single image. A property app where each listing needs photos, floor plans, and PDFs attached to the same record.
Multi file upload then becomes a core product feature, rather than a nice extra. In Bubble, the technical part is only half the job. The harder part is choosing the right upload pattern for your app, shaping the data correctly, and avoiding the problems that usually appear after launch: stalled uploads, messy databases, poor mobile behavior, and avoidable security holes.
Founders often ask the wrong first question. They ask, “How do I let people upload multiple files?” The better question is, “What upload method matches my file sizes, user behavior, and risk level?” That framing leads to better build decisions from day one.
Why Multi File Upload is a Game Changer for Your App
The one-by-one upload flow feels small when you test it yourself. It feels painful when a real user has ten files to submit.
A founder building a freelance marketplace might ask new users for portfolio images, project briefs, and proof of identity. A founder building a compliance workflow might need clients to submit several legal documents attached to a single case. In both situations, asking users to repeat the same upload action over and over creates friction fast.
Where founders feel the pain first
The problem usually shows up in ordinary workflows:
Client onboarding: A customer needs to send multiple documents before your team can start work.
Marketplace profiles: A seller or freelancer wants to upload a set of assets together, not as scattered records.
Internal operations: Staff need to add receipts, PDFs, and photos to one project or ticket.
User-generated content: A social or community app needs a batch of images attached to one post, listing, or submission.
The difference is not just convenience. It changes how complete the product feels. A polished uploader signals that your app can handle real work.
The UX cost of getting it wrong
When the upload experience is weak, users do not trust the rest of the system either. They wonder whether files saved, whether they should retry, or whether they should email the documents instead.
For large batches, the gap gets bigger. Handling batches over 100 files and giving clear progress feedback is a common challenge in no-code tools, and 60% of “Bubble multi upload” questions on Stack Overflow about progress UI and error recovery go unanswered according to the cited analysis in this Telerik-backed summary of the gap. That matters because the missing piece is rarely “how to pick several files.” It is what happens after that.
Tip: Users forgive a slow upload more easily than a silent upload. Feedback beats mystery every time.
A strong multi file upload flow reduces repeated actions, keeps related files together, and lowers support friction. It also makes your MVP feel far more serious than its budget suggests.
Choosing Your Upload Method in Bubble
The biggest mistake I see is founders choosing an upload method because it is easiest to place on the page, not because it fits the job.
Bubble gives you enough flexibility to support simple uploads, batch uploads, and more advanced storage patterns. But those paths have different trade-offs in setup effort, cost, reliability, and control.
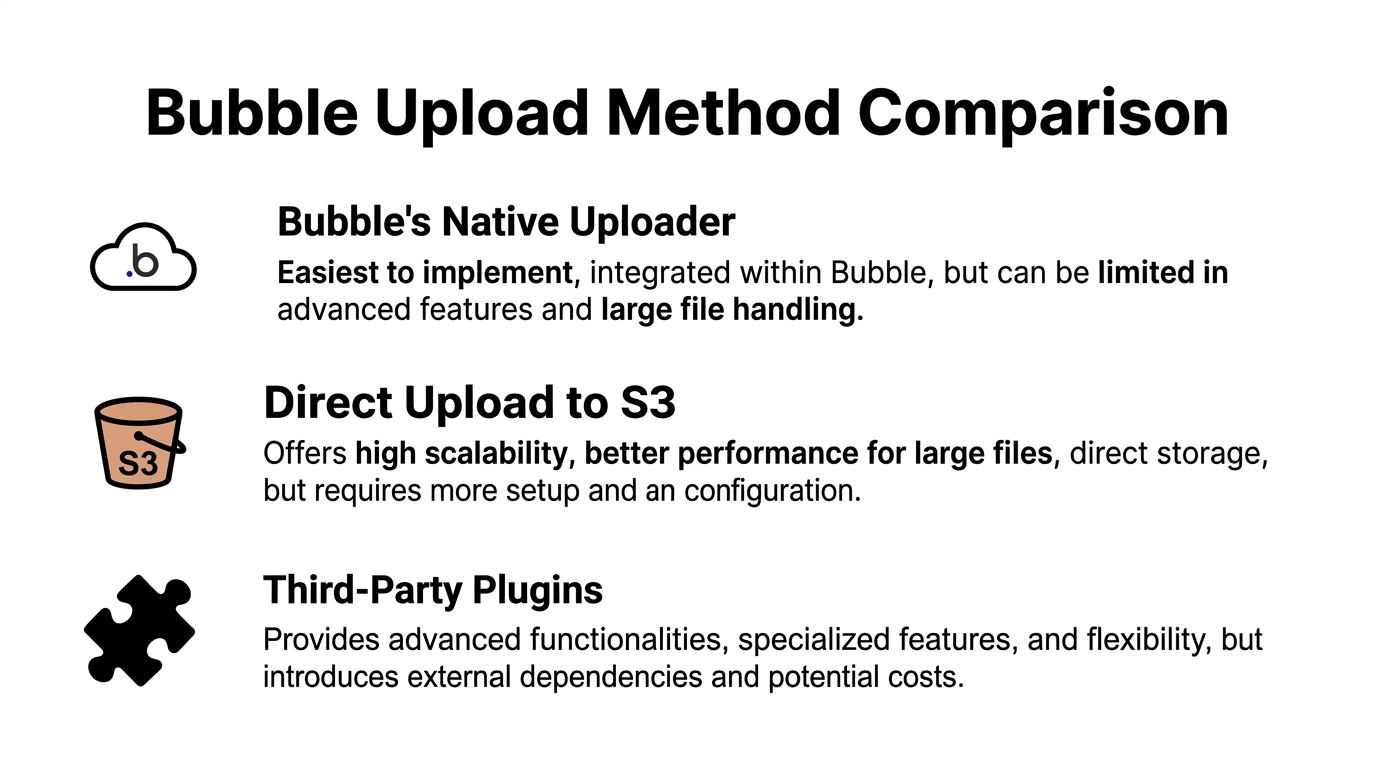
Method one uses Bubble’s native uploader
The native File Uploader is the fastest route when your app needs basic functionality.
It works well when users upload a few files, the files are modest in size, and you do not need advanced progress handling, resumability, or storage orchestration. For an MVP, that can be enough.
Use it when:
Your files are straightforward: profile images, attachments, PDFs, or small media files.
Your workflow is simple: user uploads, clicks save, record gets created.
Your team needs speed: fewer moving parts means less setup and less maintenance.
The downside is control. Once your workflow gets more complex, the native path starts to feel rigid.
Method two relies on a plugin
Plugins sit in the middle. They usually help when you need a better front-end experience or more advanced file handling without building a custom integration.
For Bubble founders, that often means drag-and-drop, richer previews, multiple selection behavior, or chunked uploads through a plugin that hides complexity. The trade-off is dependency. If the plugin is poorly maintained, your uploader becomes brittle.
A plugin makes sense when:
the native uploader is too limited,
you need a better progress UI,
or you want advanced behavior without wiring external storage logic yourself.
Method three uses direct upload to S3
This is the option for higher scale or larger file requirements. The direct-to-S3 signed URL pattern works like this: the client asks your backend for a signed URL, your backend authenticates and generates that temporary URL, and then the client uploads the file directly to S3 instead of streaming through your backend, as outlined in STRV’s breakdown of upload strategies.
That method can be up to 10x faster for uploads because your backend is not acting as a file relay, according to the same STRV analysis. But it adds real complexity. STRV also notes a common failure mode in 5-10% of sessions, where the signed URL is generated but the client aborts before the upload completes, which can create orphaned S3 objects and inflate storage costs by 20-30% without cleanup jobs.
Key takeaway: Direct-to-S3 is not the “best” method. It is the right method only when the scale or file size justifies the added operational work.
A practical comparison
Method | Ease of Use | Cost | Key Feature | Best For |
|---|---|---|---|---|
Bubble native uploader | High | Usually lowest setup cost | Built into Bubble | MVPs and simple document flows |
Third-party plugin | Medium | Varies by plugin and maintenance burden | Better UI or advanced file handling | Founders who need more UX control |
Direct upload to S3 | Lower | More setup and infrastructure overhead | Performance and scalability | Large files, high-volume media, custom storage flows |
The right question is not “Which one is most powerful?” It is “Which one solves my current problem without creating a bigger one six weeks later?”
Designing an Intuitive Uploader Interface
Most upload problems that users complain about are interface problems, not storage problems.
If the UI does not show what was selected, what is uploading, and what failed, people assume your app lost their files. That is why I treat the uploader like a mini product inside the product.
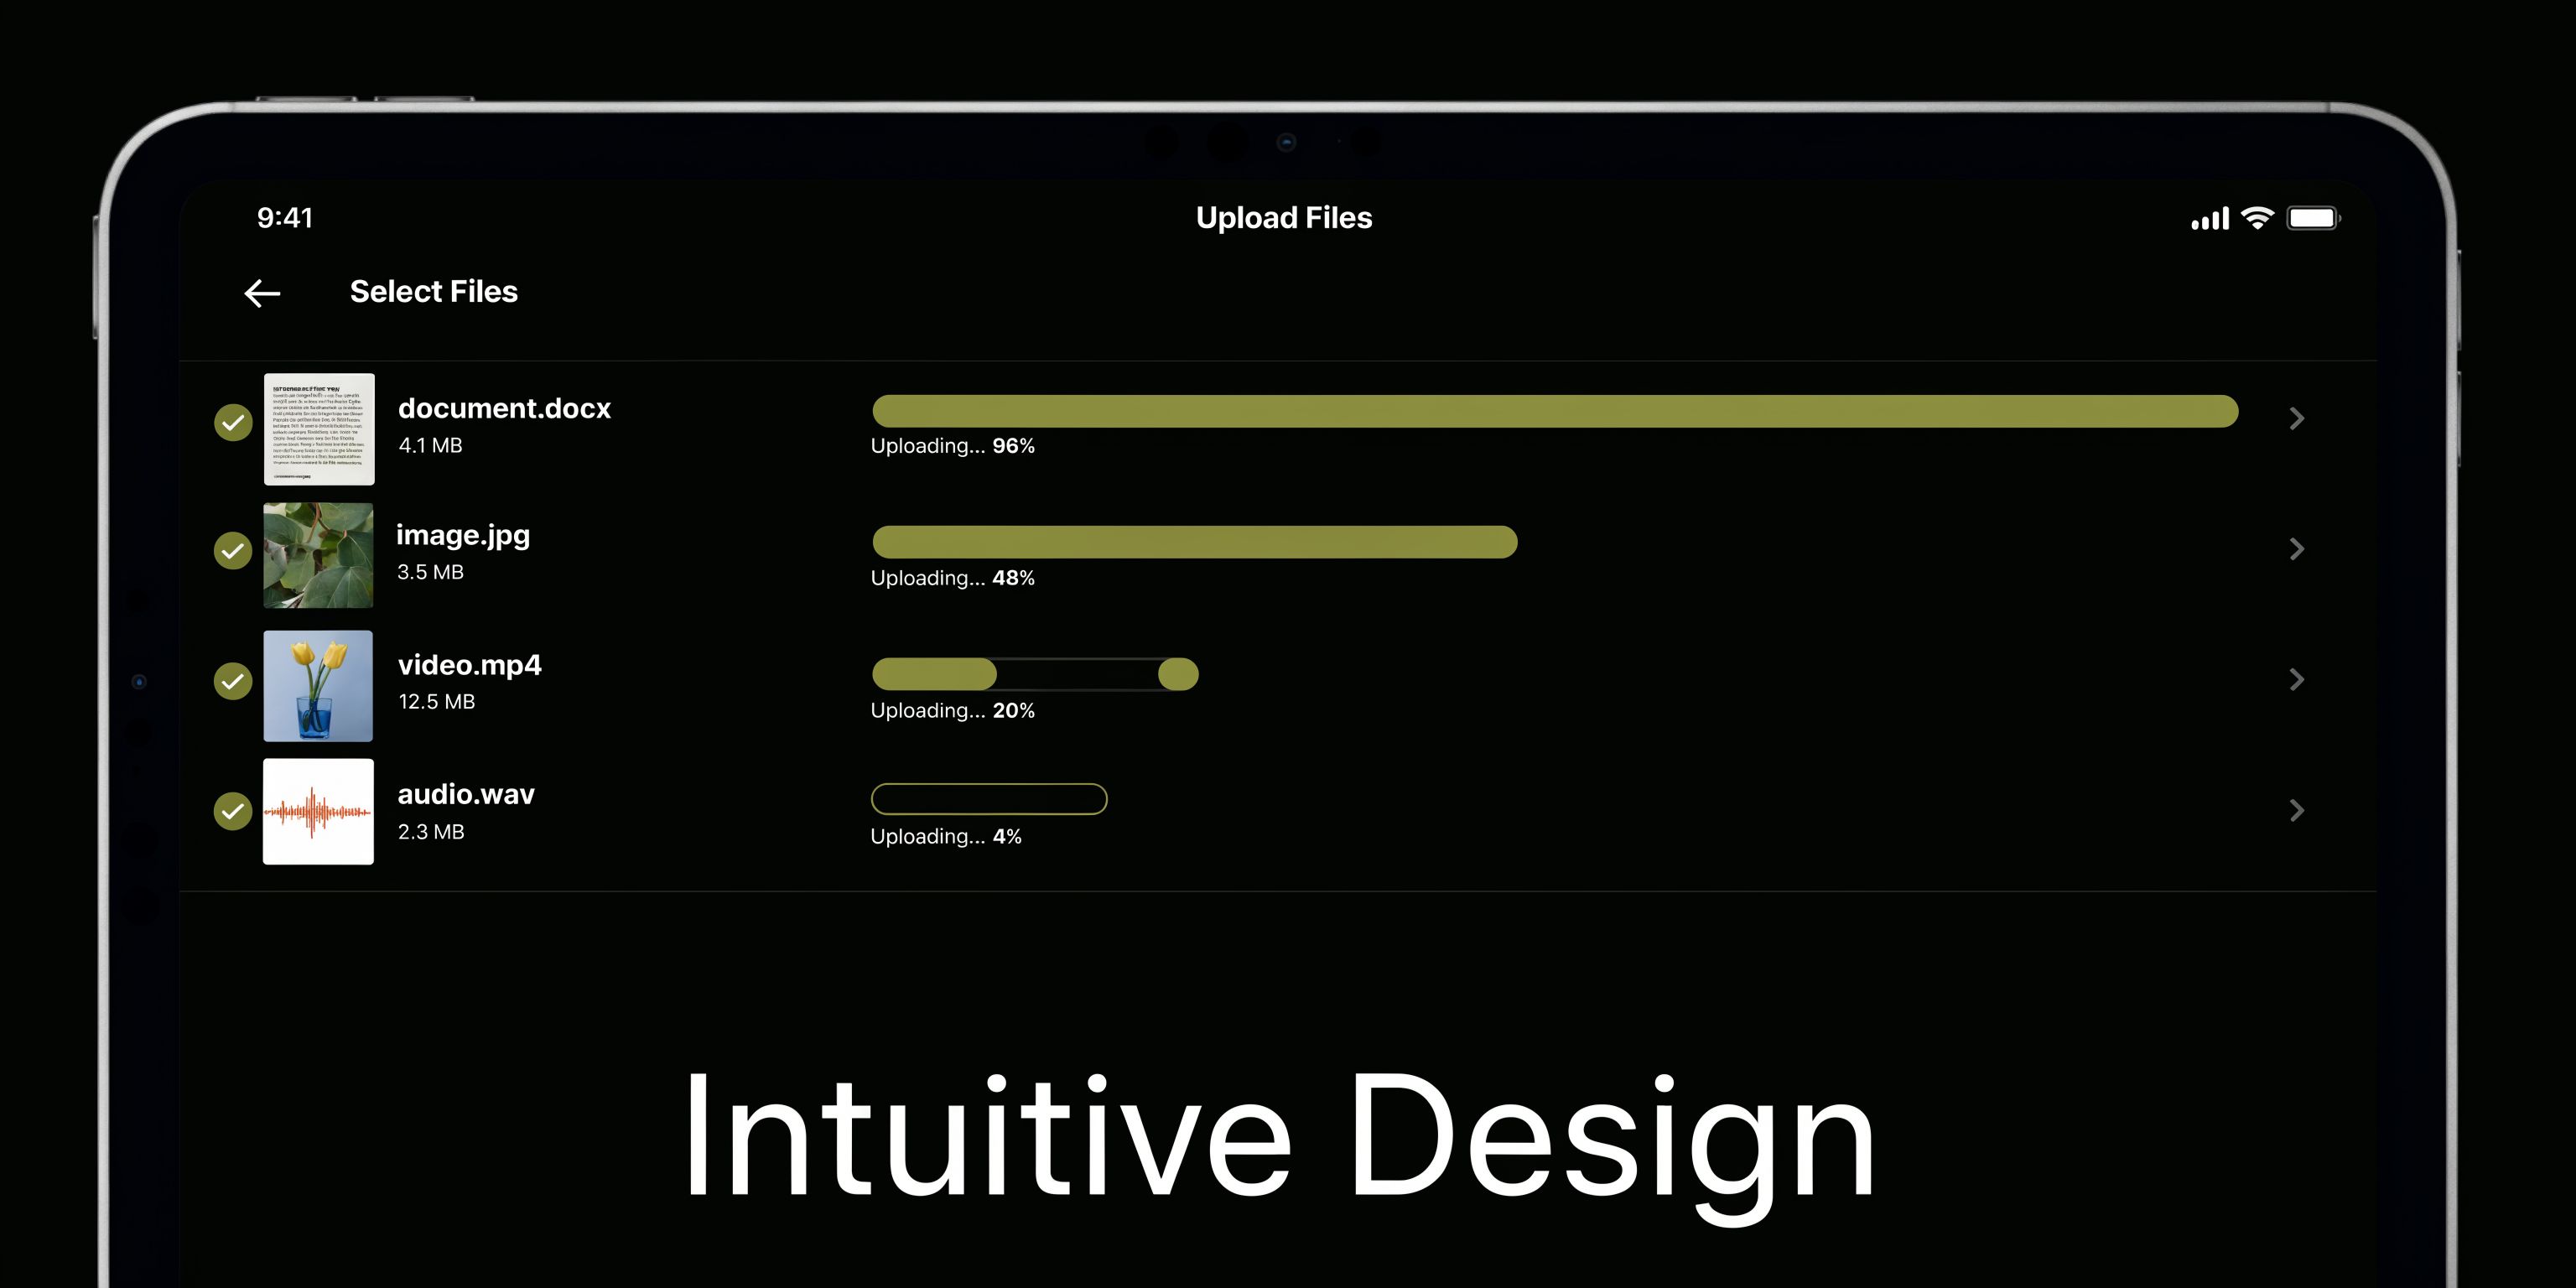
Start with visible selection states
The first job of the interface is confirming selection immediately.
When a user chooses files, show them in a repeating group before the upload starts. For images, display thumbnails. For other files, show an icon, file name, and a human-readable type label. This one step cuts a huge amount of confusion.
Your repeating group should display:
File name: so users can confirm they picked the right document.
Preview or icon: image thumbnail for photos, standard icon for PDF or document files.
Remove action: let users delete an item before the batch starts.
Status text: selected, uploading, complete, or failed.
This is also where you define limits. QuestionPro’s multiple file upload update allowed up to 10 files per question with a default 5MB individual file size limit, which is a good reminder that clear limits in the UI matter because they prevent mismatched expectations and backend errors (QuestionPro’s product update).
Show constraints before users hit an error
Do not hide the rules in a validation popup after selection.
Put file count guidance, accepted formats, and size limits directly under the upload area. If you allow images and PDFs only, say so in plain language. If you want users to upload no more than a certain number of files for a workflow, show that before they browse.
A practical interface block often includes:
A drag-and-drop zone or styled upload button.
A short line explaining allowed formats.
A note on file count or size expectations.
A visible list of selected files.
If you want the surrounding interaction to feel polished, Bubble popups often help for confirmations and edit states. This guide on a Bubble pop up button pattern is useful when you want a clean add-files flow without cluttering the main page.
Progress bars are not optional
If uploads take long enough to notice, users need progress feedback.
You can show either a batch progress bar or per-file progress bars. Batch progress is easier to build. Per-file progress is better when users upload mixed file sizes and need to see what is stuck.
I prefer per-file status when founders expect document-heavy workflows. It is easier to explain failures and retries later.
Tip: Design for interruption. A user may switch tabs, lock their phone, or change connection mid-upload.
One more point that gets ignored. Test the uploader as a piece of interface design, not just a workflow. If you want a practical framework for that, user interface design testing is a solid reference for validating clarity, feedback, and error states before launch.
Structuring Your Backend Data and Workflows
A clean front end can still produce a terrible backend if you save files the wrong way.
In Bubble, founders often start by storing a list of files on the parent thing. It looks simple. Then they want file-level permissions, statuses, review states, tags, or audit history. That is when the shortcut becomes a mess.

Use a separate Document data type
For most serious apps, create a dedicated data type such as Document and link each document back to its parent record, such as Project, Application, Property, or Submission.
That structure gives you much better control later.
A useful Document type usually includes fields like:
File
Parent thing such as Project or Client
Original file name
Uploaded by
File type or category
Status such as pending, uploaded, failed, approved
Created date
This is the same basic logic that stronger frameworks have followed for years. For example, Code On Time introduced Multi-File Upload in release 8.7.11.0 in May 2019, processing each file sequentially, creating a corresponding database row per file, capturing metadata, and refreshing the view after completion, which made batch document handling far smoother than single-file repetition (Code On Time’s release write-up).
Process one file at a time
In Bubble, the safest pattern is usually to process each selected file individually through a backend workflow.
That means the page or custom state stores the selected files first. Then, after the user confirms, you run a workflow that creates one Document record per file.
A typical pattern looks like this:
User selects multiple files.
Files are stored in a temporary list or passed into a workflow step.
You trigger Schedule API workflow on a list.
The backend creates one Document per item.
The workflow links each Document to the right parent thing.
This approach is slower to set up than “save a file list on Project,” but it ages much better.
Why this structure holds up later
Once each file is its own thing, you can do useful product work without rebuilding the data model.
You can add:
reviewer comments on a specific file,
approval status per document,
file replacement history,
privacy rules by document type,
and filtered searches such as “all PDFs uploaded by this client.”
Key takeaway: If each uploaded item matters on its own, it deserves its own database record.
This also makes debugging cleaner. When something fails, you can inspect one document record instead of trying to decode a broken list field on a parent object.
Handling Large Files and Securing Your Uploader
Small files hide bad architecture. Large files expose it immediately.
The moment founders move from profile images to videos, scanned PDFs, or bulk document sets, the basic uploader starts to struggle. Timeouts become visible. Mobile uploads fail more often. Error handling matters more than styling.

Large files need a different strategy
For large uploads, the concept to know is chunked resumable upload.
Instead of sending one giant file as a single request, the client slices it into smaller chunks, uploads those chunks in sequence or parallel, and resumes from the last successful point if the connection drops. According to Filestack’s guide to large file handling, chunked resumable uploads can raise success rates for files over 1GB to 95-99% on unstable networks, compared with 60% for monolithic uploads. The same source warns that skipping checksums can lead to corruption in as many as 15% of resumed uploads.
That is why plugin choice matters for large files. A plugin that supports resumable behavior is not just a convenience feature. It changes whether the upload is dependable.
Security starts before the file is saved
Many Bubble builders focus on getting files uploaded and leave security for later. That is backwards.
OWASP flags unrestricted file upload as a serious vulnerability because attackers can abuse file names, metadata, extensions, and server handling behavior in ways that many beginners do not anticipate. In practical Bubble terms, the main risks are allowing the wrong file types, exposing uploaded files too broadly, and trusting a plugin’s defaults more than you should.
Use a defensive baseline:
Restrict accepted types: only allow the formats your workflow needs.
Set size limits: make the UI and the workflow agree.
Separate access rules: uploaded files should not be visible to everyone by default.
Store purpose-specific metadata: know what each file is for, who uploaded it, and what it belongs to.
Avoid blind plugin trust: review how the plugin handles validation, privacy, and storage behavior.
If you want a useful wider reference point, this guide to application security best practices is worth reviewing alongside your Bubble-specific setup.
Embedded files need permission logic too
Founders often forget the second-order problem. Uploading is only half the feature. Displaying the file later must follow the same access logic.
That is especially true if you show PDFs inside the app. If your product includes secure document viewing, this practical walkthrough on embedding a PDF in a web page in Bubble helps connect the upload layer to the viewing experience without treating them as separate systems.
A short visual walkthrough can help before you harden your production flow:
Tip: Do not ask whether a file can be uploaded. Ask whether the right user can upload it, whether the wrong user can view it, and whether the system can recover when the network breaks.
Your Go-Live Checklist and Common Pitfalls to Avoid
The uploader that worked in your editor is not necessarily ready for users.
Launch problems usually come from edge cases. File names with odd characters. Mobile browsers suspending background activity. Privacy rules blocking a save. A plugin that works fine with five files and behaves badly with a large batch.
Your pre-launch checklist
Run through this before going live:
Test mixed file types: upload the formats you expect most often and confirm your validation blocks the ones you do not want.
Test file names: include spaces, long names, and unusual characters.
Test on mobile: selection, progress visibility, and completion messages often behave differently.
Test slow networks: users need clear status feedback when uploads take time.
Test partial failure: confirm what happens if one file in a batch fails.
Check privacy rules: make sure the creator can access the file after save, and unrelated users cannot.
Confirm database records: every uploaded item should create the right linked record.
Review retry behavior: users should know whether to retry one file or the whole batch.
The common pitfalls
These are the issues founders hit most often.
Privacy rules save the file but break access
The upload appears successful, but the user cannot see the file afterward.
This usually means the file or linked Document record was created without matching privacy logic. Check both the data type permissions and the page’s search constraints.
The database model is too flat
A founder stores everything in a single list field on Project, then later needs per-file review or permissions.
That is not a quick fix. It often forces a migration. If the documents have their own lifecycle, they need their own data type.
The UI hides failure
The page just stops, refreshes, or leaves the user guessing.
A proper uploader needs visible failed states, not just success states. Tell the user which file failed and what action they can take next.
Plugin defaults stay in place too long
This is the no-code version of “it worked in dev.”
OWASP notes unrestricted file uploads are a critical vulnerability, and a 2025 Verizon DBIR report cited a 15% rise in file-upload exploits, with no-code MVPs disproportionately affected because default plugin configurations often lack proper server-side validation, as summarized in the OWASP-linked material on unrestricted file upload risks. That is the kind of issue beginner tutorials rarely emphasize.
Key takeaway: Your uploader is part UX feature, part infrastructure feature, and part security feature. Launching with only one of those three in mind is how bugs become support tickets.
A practical way to debug launch issues
When something breaks, isolate one layer at a time:
Selection layer Did Bubble receive the files the user picked?
Workflow layer Did the create-record step run once per file?
Storage layer Was the file stored where you expect?
Permissions layer Can the intended user retrieve it after save?
If you are stuck in that debugging loop, getting a second set of experienced Bubble eyes can save a lot of trial and error. For deeper troubleshooting paths, this Bubble-focused support resource is a useful starting point: https://codeless.coach/blog/bubble-io-support
The best uploaders feel boring to the user. Files go in, status stays clear, records stay clean, and access stays controlled. That boring outcome usually comes from deliberate choices, not from dragging one uploader element onto a page and hoping the rest sorts itself out.
If you want help building a multi file upload flow that fits your app, not a generic template, Codeless Coach offers one-to-one Bubble guidance for founders and teams. That includes choosing the right upload method, setting up workflows, shaping your database, and fixing the edge cases that usually appear right before launch.


