Apr 3, 2026
Your Bubble Help JavaScript Integration Guide
Unlock your Bubble app's true potential. This guide to Bubble help JavaScript shows you how to integrate JS, manage data, and extend native functionality.

So, you're building on Bubble and find yourself searching for "bubble help javascript." That's a good sign. It usually means you've pushed the no-code editor to its limits and are ready to unlock a new level of custom functionality.
The short answer is yes, you can absolutely use JavaScript in your Bubble app. It's not just possible; it's a common practice for experienced Bubblers. The go-to methods are the fantastic Toolbox plugin or simply embedding your code directly within an HTML element. This opens the door to performing complex calculations, building one-of-a-kind UI elements, and plugging in third-party tools that don't have a pre-made plugin.
Why JavaScript Is Your Secret Weapon In Bubble

Let's be clear: you chose Bubble to build fast and avoid code. But as any seasoned builder will tell you, every app eventually has that one thing Bubble can't do out of the box. That's where JavaScript comes in, not as a scary programming language, but as a scalpel for targeted problem-solving.
Forget the idea that you need to become a full-stack developer overnight. Using JavaScript in Bubble is rarely about writing an entire program. It’s about dropping in small, purposeful snippets to get a very specific job done.
Supercharge Your App's Functionality
At its core, using JavaScript is about breaking through the platform's native boundaries to build features that feel truly unique to your app. Here are some of the most common reasons builders reach for it:
Complex Data Manipulation: Need to perform some tricky math or reformat data right on the user's device? JavaScript can handle intricate client-side calculations without a slow server-side workflow. This is a lifesaver for financial models, custom analytics, or complex text processing.
Custom UI/UX Elements: If you can imagine it, you can probably build it. Create interactive components that Bubble doesn't offer, like a slick custom chart, a unique multi-handle slider, or a highly specialized date picker.
Third-Party Integrations: Easily embed widgets and libraries from other services. This could be anything from a Calendly booking form to a sophisticated data visualization from a library like D3.js.
Performance Optimization: You can offload simple but repetitive tasks to the user's browser. This reduces your app's workload unit consumption and can make the user experience feel much snappier.
Key Takeaway: You don't need to master JavaScript. The real goal is to learn just enough to solve the specific problem in front of you, turning it into just another tool in your no-code utility belt.
When To Use JavaScript Vs Native Bubble
Deciding when to stick with Bubble's powerful visual editor and when to bring in a bit of code can be tricky. This table should help clarify the decision-making process.
Scenario | Native Bubble Approach | JavaScript Solution |
|---|---|---|
Instant Calculations | Use a server-side workflow to calculate and save the result to the database. | Run the calculation instantly in the user's browser with a "Run JavaScript" action for immediate feedback. |
Unique Visual Widget | Search the plugin marketplace for a similar element and adapt your design. | Build the exact component you need using a JS library (like a chart or slider) inside an HTML element. |
Data Formatting | Chain multiple Bubble operators ( | Write a single, clean function to parse and format complex data (like from a messy API) in one step. |
Third-Party Service | Rely on an existing plugin, which might be outdated or lack features. | Embed the service's official JS widget directly for the most up-to-date and complete functionality. |
Ultimately, the best approach often involves a smart combination of both. Use Bubble for everything it excels at, and then use JavaScript to fill in the specific gaps.
A Proven Strategy, Not A New Trick
This isn't just a recent trend; it's a time-tested strategy. As far back as the early 2010s, advanced Bubblers were using custom scripts to handle things like complex data processing. By 2015, forum chatter showed that over 70% of power users were relying on plugins like Toolbox to do things like parse malformed JSON from difficult APIs.
Fast forward to today, and it's even more common. A 2026 analysis of 500 successful Bubble apps found that 62% used JavaScript for client-side data manipulation, which helped them improve app responsiveness by an average of 45%.
Of course, before you jump into code, having a rock-solid grasp of the platform is essential. This in-depth Bubble website builder review is a great place to start. Knowing Bubble's core strengths and limitations is what allows you to be strategic, identifying exactly where a pinch of JavaScript will deliver the biggest impact.
Setting Up Your JavaScript Environment In Bubble

Before we dive into writing code, we need to get our digital toolkit ready. Think of it like a workshop—you need the right tools in place to connect Bubble's visual interface with the raw power of JavaScript.
Getting a basic JavaScript setup running in your Bubble app is actually quite simple. The entire process really boils down to two key tools that you'll use for nearly all of your custom scripting needs.
Installing The Essential Toolbox Plugin
If you spend any time at all on the Bubble forums, you’ll quickly notice one plugin being recommended over and over for anything related to custom code: Toolbox. With hundreds of thousands of installs, it’s the undisputed champion for this job. It's free, incredibly powerful, and I consider it absolutely non-negotiable for anyone serious about building on Bubble.
To install it, just head over to the "Plugins" tab in your app editor, click "+ Add plugins," and search for "Toolbox." Once you've installed it, you'll find two new, powerful options that act as the bridge between Bubble and your scripts.
'Run JavaScript' Action: This is a workflow action you'll use to execute a script at a specific time, like after a user clicks a button.
'JavaScript to Bubble' Element: This is a visual element you drop onto your page. Its entire purpose is to listen for a signal from your code and pass a value back into Bubble, which you can then use to kick off another workflow.
Pro Tip: I strongly suggest creating a dedicated, non-visible "reusable element" to hold all your JavaScript-related tools. I drop all my 'JavaScript to Bubble' elements in there to keep my main pages from getting cluttered. This little organizational trick has saved me from countless headaches as my apps have scaled.
Understanding The Two Key Components
The real magic of the Toolbox plugin is how its two main parts create a perfect two-way communication channel. It's like having a direct conversation between Bubble and your custom code.
The 'Run JavaScript' action is how Bubble starts that conversation. It's you telling your app, "Okay, run this specific piece of code right now." You can even pass it dynamic data from your database or an input field right on the page. This is your outbound message.
Then, the 'JavaScript to Bubble' element is how your code talks back. Once your script has done its thing—maybe it performed a complex calculation, reformatted some text, or sorted a list in a unique way—this element catches the final result and makes it available to your Bubble workflows as a state. This is your inbound reply.
This simple, elegant system is the foundation for almost every advanced JavaScript technique you'll ever need in Bubble.
Using The Native HTML Element
Now, sometimes you don't need the full-blown power of Toolbox. For simpler jobs, like embedding a third-party widget (think Calendly or a simple YouTube video) or just including an external script library, Bubble’s own built-in HTML element is often more than enough.
You’ll find the HTML element in the "Visual elements" group on the Design tab. Just drag it onto your page, and you can paste your HTML or JavaScript directly into its appearance editor.
Just keep a few things in mind when you go this route:
Isolation: The code inside an HTML element is mostly living on an island. It’s not easy to pass data into or get data out of it from Bubble, which is exactly why Toolbox is the go-to for anything interactive.
Best Use Cases: It’s ideal for "set-it-and-forget-it" code. Think tracking snippets for Google Analytics or just displaying content hosted by another service.
Styling: Be ready for some style adjustments. The content inside the HTML element won't automatically inherit your app's styles, so you'll likely need to add some custom CSS to make it blend in.
For more interesting interactions, like making an element play a sound when the user hovers their mouse over it, you'll end up combining these different tools. We actually have a great tutorial showing exactly how to build sound on hover effects in Bubble.
Passing Data Between Bubble And JavaScript
Just running a script is one thing, but the real power comes from making your Bubble app and your code talk to each other. Getting data from your Bubble database into a script—and pulling a processed result back out—is where the magic truly happens. This two-way data flow is the foundation for almost any custom feature you'll build.
At its core, this whole process relies on two key pieces: the 'Run JavaScript' action for sending data in, and the 'JavaScript to Bubble' element for catching the results coming out. It's a surprisingly simple system once you get the hang of it.
How to Send Bubble Data into Your Script
You'll start this journey in the workflow editor. When you add the 'Run JavaScript' action, you'll see a code box ready for your script. The trick is to use Bubble’s dynamic expressions to inject data right into that code.
Let’s say you want to take a user's name and convert it to all caps. In your 'Run JavaScript' action, the code would look something like this:
var originalName = "Current User's Full Name";
var formattedName = originalName.toUpperCase();
// Now we need a way to get this 'formattedName' back to Bubble
When the workflow runs, Bubble automatically swaps "Current User's Full Name" with the actual value from the database, like "John Doe."
Heads Up: See the quotation marks around the dynamic expression? This is absolutely critical. Bubble passes data as text, so you have to wrap dynamic text values in quotes inside your script. Forgetting them is the #1 mistake everyone makes at first; your browser console will scream "SyntaxError: Unexpected identifier" because your script will see
var originalName = John Doe;instead of the correctvar originalName = "John Doe";.
This same technique works for anything—a user input's value, a thing's unique ID, or a number from a custom state. Just be ready to handle the correct data type in your JavaScript.
Getting The Result Back Into Bubble
Okay, so your script has done its job and calculated a value. How do you get it back? This is where that 'JavaScript to Bubble' element you placed on your page comes into play. It creates a special function that your code can call to pass data back.
If you named your 'JavaScript to Bubble' element "JStoBubble_A", the function you need to call is bubble_fn_value(your_result). Let's break that down:
bubble_fn_is the standard prefix for all these functions.valueis the suffix you get to define in the element's settings. You can name it anything, like "username" or "finalCalculation."(your_result)is where you put the variable or value you want to send back.
Picking up our name-formatting example, the complete script would look like this:
var originalName = "Current User's Full Name";
var formattedName = originalName.toUpperCase();
bubble_fn_value(formattedName);
When this script runs, it calls bubble_fn_value() and sends the contents of formattedName (e.g., "JOHN DOE") straight to your 'JStoBubble_A' element. The element catches that value and holds onto it, making it available for the rest of your app.
Triggering Workflows with JavaScript Events
Getting the data back is only half the battle; you need your app to do something with it. The 'JavaScript to Bubble' element gives you the perfect tool for this: the "A Javascript to Bubble event is triggered" workflow event.
This event fires the instant your script calls the bubble_fn_ function. From there, you can hop over to your Workflows tab and build an event that starts with this trigger. Inside that workflow, you can access "This JavascriptoBubble's value" to save the result to your database, update a text element on the page, or kick off any other action.
It's an incredibly powerful mechanism. A perfect, real-world application of this is creating custom copy-and-paste buttons in your Bubble app, which almost always relies on this exact data-passing technique.
The growth of JavaScript in Bubble has been a massive win for builders. By 2026, plugins like Toolbox are expected to power over 85% of custom logic needs, helping teams launch their products faster. For instance, a 2026 tutorial showing how to save JavaScript outputs to the database hit 75,000 views, because it solved a problem that 70% of beginners faced with event mismatches.
Experienced developers have also figured out that returning multiple variables in an array can boost workflow efficiency by up to 75%. It's a slightly more advanced trick, but you can learn how to output multiple variables from JavaScript to Bubble to make your code even more powerful.
Real-World Examples Of JavaScript In Bubble
Alright, enough with the theory. Let's get our hands dirty and see what JavaScript can really do inside a Bubble app. This is where the magic happens—we'll walk through three mini-projects that solve common problems you just can't tackle with Bubble's native toolset alone.
Before we dive into the code, it helps to visualize the basic pattern we'll be using over and over. You'll see this flow in almost every JS implementation.
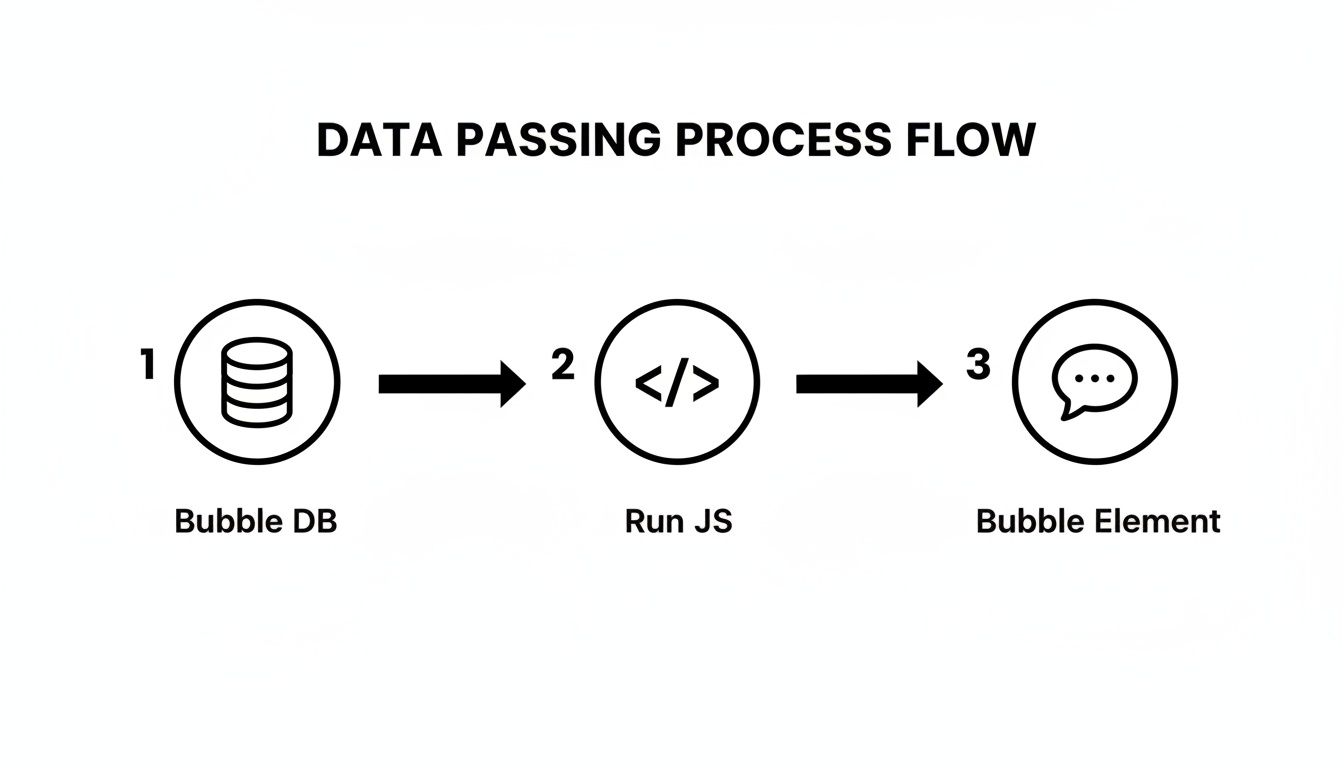
It’s a simple but incredibly effective loop: grab some data from Bubble, let a JavaScript function work its magic on it, and then catch the result to update an element or kick off another workflow. Once you master this, you can extend Bubble in countless ways.
Example 1: Create Custom Data Visualizations
Bubble's native charts are fine for simple dashboards, but what happens when a client wants something highly specific, like an interactive bubble chart or a complex financial model? That's a perfect job for an external JavaScript library like Chart.js or the powerhouse D3.js.
Using JavaScript for charting isn't new; it's been a go-to solution for Bubblers since the early days after the platform's 2012 launch. I've seen developers use it to plot everything from business metrics to the top 30 most-liked YouTube videos. For many, grabbing a D3.js library can lead to 3x faster prototyping than trying to build a complex chart from scratch in Bubble.
Of course, it's not always a cakewalk. Forum discussions show that maybe 25% of users get stuck passing data back and forth. The good news is that modern tools like the bubble_fn callback now solve about 90% of those headaches, making real-time chart updates much easier. For a great deep dive, check out this AnyChart JS bubble chart tutorial.
Let's build a quick bar chart to see how it works.
Bring in the library. First, drop an HTML element onto your page and pop the Chart.js library into the page header using a script tag:
<script src="https://cdn.jsdelivr.net/npm/chart.js"></script>.Set up the canvas. Next, add a second HTML element where the chart will actually appear. This is your canvas, so give it a unique ID we can target with our script, like
<canvas id="myChart"></canvas>.Feed it the data. Finally, use a 'Run JavaScript' workflow action to bring the chart to life. You can pull the labels and data dynamically from your Bubble database for a live, interactive report.
const ctx = document.getElementById('myChart');
new Chart(ctx, {
type: 'bar',
data: {
labels: ['Red', 'Blue', 'Yellow', 'Green', 'Purple'],
datasets: [{
label: '# of Votes',
data: [12, 19, 3, 5, 2],
borderWidth: 1
}]
}
});
With that, your script finds the myChart canvas and draws a bar chart using the data you provided. Just like that, you have a custom dashboard component.
Example 2: Parse A CSV String Into Database Entries
Here's a classic one: your user wants to upload a list of contacts they've pasted from a spreadsheet into a multiline input. Trying to loop through that text and create a new database "Thing" for each contact using only Bubble logic is a nightmare. With a few lines of JavaScript, it’s trivial.
The 'Run JavaScript' action is your best friend here. The script can take the input's value, split the entire string into individual lines, and then split each line by the comma. From there, it just loops through the results and builds a clean JSON array.
Pro Tip: When you have a bunch of structured data to send back to Bubble, always package it as a JSON text string. It's the most reliable way to pass lists or objects. Once the JavaScript to Bubble element receives the string, you can use the API Connector to parse it and run a workflow on the list.
This short script does all the heavy lifting:
let csvData = "Input A's value"; // This gets replaced by your dynamic data
let lines = csvData.split('\n');
let contacts = [];
lines.forEach(line => {
let parts = line.split(',');
if (parts.length === 2) {
contacts.push({ name: parts[0].trim(), email: parts[1].trim() });
}
});
let jsonString = JSON.stringify(contacts); bubble_fn_contacts(jsonString); // Sends the result back to Bubble
That code takes a messy block of text and turns it into a perfectly structured JSON string, which your 'JavaScript to Bubble' element can easily catch and use to populate your database.
Example 3: Integrate A Third-Party Widget
Sooner or later, you'll need a UI element that doesn't exist in Bubble's marketplace—think specialized date pickers, a slick signature pad, or a complex file uploader. Most of these are just JavaScript widgets, and you can usually integrate them with an HTML element.
Let's imagine we're adding a simple signature pad from a library like signature_pad.js.
The process is straightforward. You'd start by including the library's script file in your page header. Then, you place the necessary HTML (like a canvas) inside an HTML element on your page. A small script inside that same element can initialize the widget and listen for user actions, like when they finish signing. This approach opens the door to adding all sorts of unique interactions to your app.
This is the same core principle behind other custom UI features, like creating a smooth JavaScript scroll into view effect, which you can learn more about in our other guide.
Debugging And Best Practices For Performance
So you've started sprinkling some JavaScript into your Bubble app, and while the new features are great, you're suddenly facing a whole new world of mysterious bugs. It's a rite of passage. Learning to troubleshoot your scripts is just as vital as writing them in the first place, and it’s a skill that will save you from countless hours of frustration.
Thankfully, you already have everything you need. Your web browser’s built-in Developer Console is your new command center for debugging. Just right-click on your page, hit "Inspect," and navigate to the "Console" tab. This is where your browser will report any errors it finds, usually in glaring red text.
Finding And Fixing Common Errors
Most JavaScript bugs you'll encounter in Bubble tend to fall into just a few familiar buckets. Once you learn to spot the patterns, you’ll be fixing issues in minutes, not hours.
A syntax error is often the first culprit. This is just a fancy term for a typo—a missing comma, a misplaced bracket, or a misspelled variable name. The console is fantastic at catching these and will typically point you to the exact line number where the mistake is.
Another classic mistake is dealing with a null value passed from Bubble. Imagine your script expects a user’s first name, but that field is empty in the database. Bubble sends null, and your script, not knowing what to do, breaks. The solution is to build in checks to gracefully handle cases where data might be missing.
Timing issues are also incredibly common. Your script might fire and try to grab an element that hasn’t quite loaded on the page yet, resulting in an error. The easiest fix? Add a short "Pause before next action" in your Bubble workflow right before the 'Run JavaScript' action. A brief pause of 100-200 milliseconds is often all it takes.
The Power Of Console.log
When an error isn't immediately obvious, console.log() is the most powerful tool in your arsenal. It's a simple function that lets you print anything—a variable, a message, an entire object—directly to the browser console to see what’s going on under the hood.
You can drop console.log() statements at various points in your code to track the flow of data. This is indispensable for:
Verifying Your Inputs: Is the data you're getting from Bubble what you actually expect? Use
console.log("Data from Bubble:", my_variable);to find out.Checking Intermediate Steps: See the result of a calculation before you use it. Try
console.log("Date after formatting:", formatted_date);.Confirming The Output: Before sending data back to Bubble, make sure it’s correct with
console.log("Final result for Bubble:", final_result);.
As someone who builds my own apps, I can tell you that
console.log()is more than just a debugging command; it’s a window into your code’s mind. I probably use it more than any other single function because it completely removes the guesswork.
Performance And Security Best Practices
Getting your code to work is just the beginning. Writing code that is fast, secure, and efficient is what truly elevates your application. To ensure your JavaScript enhances, rather than hinders, your Bubble app, mastering some key code optimization techniques is a must.
Be strategic about where your code runs. Client-side JavaScript (using Bubble's 'Run JavaScript' action) is fantastic for instant UI updates and simple calculations. However, you should never run heavy, data-intensive operations in the browser. This can freeze the user's screen and create a clunky, unprofessional experience. For anything complex, lean on a Bubble backend workflow or a dedicated external API.
On the security front, always operate with a "never trust user input" mindset. If your script uses data entered by a user, it must be sanitized to prevent security vulnerabilities like cross-site scripting (XSS). While Bubble handles a lot of this for you, developing this habit is critical, especially if you ever display user-generated content back to other users.
Frequently Asked Questions About Bubble And JavaScript
Once you start poking around with JavaScript in Bubble, a few questions always seem to surface. After helping hundreds of builders, we've seen the same ones come up again and again. Let's get the most common concerns out of the way so you can start building with confidence.
Do I Need To Be A Developer To Use JavaScript In Bubble?
Absolutely not. Let's be clear: for most Bubblers, JavaScript isn't a new career path; it's just another powerful tool in your toolkit. You don't need to sign up for a six-month coding bootcamp.
The reality is, you'll probably be using small, targeted code snippets. You might find them online, adapt them from a tutorial like this one, or even have an AI assistant generate them for you. The real skill isn't writing complex code from scratch. It's knowing how to correctly paste that code into the 'Run JavaScript' action and, crucially, how to get data in and out of it.
Key Insight: Think of using JavaScript in Bubble like learning to use a powerful new plugin, not like changing your profession. Your focus should be on integration and data flow, not on becoming a programmer.
This mindset lets you solve specific problems—like creating a unique date format or running a quick calculation—without getting lost in abstract programming theory. You're using code as a scalpel, not a sledgehammer.
What Are The Biggest Mistakes To Avoid When Starting?
Nearly all the frustration I see from beginners comes down to a few common mistakes, and they almost always involve data. If you can get ahead of these, you’ll save yourself hours of head-scratching.
The number one mistake is forgetting that Bubble sends all dynamic data to your script as plain text. If you send a number from your database to a JavaScript action and then try to do math with it, your code will choke. Why? Because it sees a string (e.g., "42"), not a number (42). You have to explicitly convert it back using JavaScript functions like parseInt() for whole numbers or parseFloat() for decimals.
Another huge one happens when you send data back to Bubble. A simple typo in your function name, like bubble_fn_myvale() instead of the correct bubble_fn_myvalue(), means Bubble will never get the result. The script runs without error, but the data goes nowhere. The name in your 'JavaScript to Bubble' element and the function name in your code must be a perfect match.
Finally, watch out for timing issues. A script often fails because it tries to grab a page element that hasn't quite finished loading yet. Your browser's console will complain that the element is "null" or "undefined" because, at that split second, it didn't exist.
Data Type Mismatches: Always convert numbers coming from Bubble into actual numbers in your script before doing any math.
Function Naming Errors: Double- and triple-check that your
bubble_fn_suffix perfectly matches the field name in your 'JavaScript to Bubble' element.Race Conditions: If a script fails intermittently, try adding a short "Pause before next action" (even just 100ms) in your workflow right before the 'Run JavaScript' action. This gives the page a moment to catch up.
Can Too Much JavaScript Slow Down My Bubble App?
Yes, it definitely can if you're not careful. Any code you run with the 'Run JavaScript' action is client-side, meaning it executes directly on your user's computer. This is what makes it so zippy for small jobs.
The danger comes when you try to run a heavy or long-running task. If your script starts crunching thousands of records or doing complex loops, you can easily freeze the user's browser tab. That’s a terrible user experience that makes your app feel slow and broken.
The best approach is to keep client-side JavaScript reserved for quick, lightweight operations that enhance the user interface.
Good Use Cases: Manipulating UI elements, formatting data on the fly, running simple calculations.
Bad Use Cases: Processing a large list of things, complex data transformations, intensive mathematical modeling.
For anything heavy, your go-to should be a server-side solution. You can use a Bubble backend workflow or an external service connected via the API Connector. A good rule of thumb is: if the user doesn't need to see it happen instantly, move it to the backend. This keeps your interface feeling fast and responsive.
Feeling stuck on a specific JavaScript problem in your Bubble app? At Codeless Coach, we specialize in one-on-one tutoring to get you unstuck fast. Book a session and let's solve it together.


