Mar 12, 2026
Your Guide to the Bubble App Builder in 2026
Master the Bubble app builder with our guide. Learn to scope your MVP, design the UI, build workflows, and launch your app without code. Start building today.

So, you have a killer app idea but don't know the first thing about code. You’re in exactly the right place. The Bubble app builder is one of the most powerful tools out there for building sophisticated web applications without writing a single line of code. It's how founders and creators are bringing their ideas to life faster than ever.
Getting Started with the Bubble App Builder

If you've ever felt that a great idea was locked behind a technical wall, you're not alone. The good news is that the no-code movement has torn that wall down. Bubble stands out because it lets you build almost anything you can dream up, from a new social media platform to complex internal business software.
Unlike simpler website builders that just handle static pages, Bubble is designed for dynamic, data-driven applications. This means you can create apps with user logins, intricate database structures, and all the interactive features that make modern software feel alive.
To give you a head start, here's a quick look at the foundational stages of building your first application.
Your First 3 Steps in the Bubble App Builder
Stage | Key Action | Pro Tip from Codeless Coach |
|---|---|---|
1. UI Design | Drag and drop elements like text, buttons, and images onto the page to create your user interface. | Start with a simple wireframe on paper first. It saves a ton of time before you even touch the editor. |
2. Data Structure | Define your database by creating "Data Types" (like 'User' or 'Product') and adding relevant fields. | Think of this as setting up your spreadsheets. Get the columns right, and everything else gets easier. |
3. Workflows | Create logic by defining "when/then" actions. For example, "When a user clicks 'Sign Up', then create a new user account." | Begin with the most critical user action, like signing up or creating a post. Build out from there. |
Getting these three things right is the core of building a functional Bubble application.
The Power of Visual Development
What makes Bubble so effective is its visual-first approach. Instead of writing code, you build your app using a drag-and-drop editor for the design and a workflow builder for the logic. From my experience, this fundamentally changes how you build products.
Launch Incredibly Fast: You can get a Minimum Viable Product (MVP) in front of real users in a fraction of the time it would take with traditional developers. We're talking weeks, not months.
Slash Your Costs: Building without a team of engineers means your startup capital goes a lot further.
Maintain Full Control: You are the builder. You can tweak designs, add features, and pivot your strategy instantly, without waiting on anyone.
This hands-on approach has built a massive community of entrepreneurs and creators. As you dive in, you'll likely be learning as you go, and some general online course tips can really help you absorb the concepts more effectively.
More Than Just a Tool—A Movement
When you start using the Bubble app builder, you're not just picking up a new piece of software. You're joining a global community. As of 2026, Bubble powers over 4.69 million applications worldwide, a figure that’s growing by 30-35% each year. This isn't just a niche trend; it's a fundamental shift in how software gets made.
Choosing the Bubble app builder is less about avoiding code and more about embracing a faster, more efficient way to validate ideas, build real products, and launch a business. It puts the power of creation directly into your hands.
Of course, Bubble is just one of many great no-code tools. To get a better sense of the landscape and see how it compares to other platforms, check out our guide on the best app builders available today. This context helps clarify why Bubble is the top choice for so many people looking to build a serious MVP.
Scoping Your MVP and Setting Up for Success

I see it all the time: a new builder gets a brilliant idea, dives headfirst into Bubble, and tries to build every feature they can dream of. That initial excitement quickly leads to feature bloat, and what started as a simple, powerful concept becomes a complicated mess that never actually launches.
The secret to shipping your first app is ruthless focus. It all starts with defining your Minimum Viable Product (MVP).
An MVP isn't a watered-down version of your app; it's the most direct version. It's the core solution to the single most important problem your user has. Forget the long list of cool features. Instead, ask yourself this one question: "What is the one job my user is hiring this app to do?" Build that. Only that.
Let’s say you’re building a project management tool. Your mind might jump to time tracking, invoicing, and team chat. Stop right there. The real problem you're solving might be much simpler, like "helping freelancers organize their tasks." For that, an MVP only needs a way to create projects and add to-do items. Everything else is just noise for a later version.
Define Your Core Features with User Stories
A great way to keep yourself honest and focused is to write simple user stories. This technique forces you to frame every feature from the user's perspective, making sure every bit of work delivers real, tangible value.
The format is simple: "As a [type of user], I want to [perform an action] so that I can [achieve a goal]."
Let's apply this to our freelance project management app:
User Signup: "As a new user, I want to create an account with my email and password so that I can save my projects."
Project Creation: "As a freelancer, I want to create a new project with a name and a deadline so that I can track my work."
Task Management: "As a freelancer, I want to add tasks to a project so that I can see what needs to be done."
If a feature doesn't fit into a core user story like these, it goes on the "nice-to-have" list for V2. This discipline keeps your initial build lean, which is absolutely critical when you're getting started with a powerful bubble app builder.
Setting Up Your First Bubble Project
With your tight MVP scope in hand, it's time to actually set up your project in the Bubble editor. A little organization now will save you from massive headaches and refactoring later on. Trust me.
After creating your Bubble account, click "Create a new app." You'll give it a name and answer a few quick questions that help Bubble pre-configure some basic settings for you.
Once you’re in the editor, you'll be spending most of your time in three main tabs. Get to know them well:
Design: This is your canvas. Here, you'll drag and drop all the visual pieces of your app—text, buttons, input forms, and images—to build the user interface.
Workflow: This is the brain of your app. It's where you define all the logic. Think "When the 'Save' button is clicked, create a new thing in the database."
Data: This is your database. You’ll define your "Data Types" (like User, Project, or Task) and all the fields they contain (for instance, a User has an 'email' field, and a Project has a 'deadline' field).
Pro Tip: Before you drag a single element onto the page, go to the Settings > General tab and make sure the new Responsive Engine is enabled. It's a non-negotiable for any modern app. This engine is a game-changer for creating layouts that look great on any device, from a phone to a desktop monitor.
The bubble app builder is a serious tool. It's not just for designers prototyping UIs or small businesses connecting a few Zapier flows. With a market where 65% of new apps are expected to be built on no-code or low-code platforms by 2026, Bubble's impressive 85%+ retention rate proves it’s a foundational part of the tech stack, not a passing trend. It gives founders the power to validate ideas and scale globally without a massive dev team. You can read more about Bubble's growth and market impact to see just how significant this movement is.
Nailing these first steps—scoping, user stories, and project setup—lays the foundation for everything that comes next. Get this right, and you're already halfway to a successful launch.
Nailing the UI and Responsive Engine
Let's be honest: a slick, professional user interface isn't just about looking good. It’s what gives your app instant credibility and makes people trust it from the first click. In the Bubble.io app builder, getting that polished feel has moved way beyond just dragging and dropping elements onto a page. The real secret to a modern, bulletproof design is getting your head around Bubble's powerful Responsive Engine.
This engine is what makes your app look and feel great everywhere, from a huge desktop monitor right down to a smartphone. If you ignore it, you’re basically guaranteeing your app will look broken on some screen sizes—and that’s a fast track to losing users.
The Core Idea: It’s All About Containers
The biggest mental shift you need to make is to stop thinking of your page as a flat canvas. Instead, picture it as a set of nested boxes, which Bubble calls containers. Instead of locking an element into a specific spot, you group related elements inside these containers and then tell the containers how to behave.
You'll find yourself constantly reaching for three main container layouts:
Row: Lines up everything inside it horizontally, side-by-side.
Column: Stacks all the items vertically, one on top of the other.
Align to Parent: Lets you pin an element to a corner or edge of the container it's in.
Imagine a standard website header. That’s a perfect job for a "Row" container. Inside that row, you’d have your logo in one group, the navigation links in another, and the "Sign Up" button in a third. By tweaking the spacing rules, you can make sure they all stay perfectly aligned and spaced out, no matter how wide or narrow the screen gets.
This move away from fixed-pixel design to a responsive, container-based model is the single most important skill you can learn for building on Bubble today. It's the difference between an app that feels amateur and brittle versus one that's robust and professional.
Building One Design for Every Screen
What’s so great about the Responsive Engine is that it lets you build one design that just works everywhere. Gone are the days of building a completely separate page for mobile. Now, you build a flexible structure that automatically reflows and adapts.
A classic rookie mistake is trying to cram too much information onto the screen, leading to a cluttered mess on smaller devices. The smarter way to work is with hiding rules. You can tell specific elements—or even entire containers—to only be visible on certain screen sizes. For example, that big, detailed sidebar on your desktop view? Just hide it on mobile and show a simple hamburger menu icon instead. If you're building a mobile-first app, you can find more specific strategies for mobile app design in our in-depth guide.
Getting these details right is what separates casual builders from serious creators. In fact, dedicated builders are known to spend about 50 minutes per session on average, meticulously tweaking designs and workflows. The community is huge and active; bubble.io saw a staggering 2.04 million visits in January 2026, with the most active builders hailing from the United States, Brazil, and Australia. The sheer scale shows you’re joining a massive, dedicated community of creators.
Common Responsive Pitfalls I See All the Time
Even with this powerful engine, it's easy to get tripped up. Here are a few of the most common mistakes I see when I'm tutoring new builders, and more importantly, how to fix them.
1. Using Fixed-Width Elements
Setting a button or an input field to a fixed width, like 300 pixels, might look perfect on your laptop. But on a narrow phone screen, it will either get cut off or break the layout entirely.
The Fix: Use percentages for width, or better yet, let elements stretch to fill the space in their container. You can still set a minimum and maximum width to keep things from getting too small or comically large.
2. Forgetting to Add Breathing Room
When you just drop elements into a Row or Column container, they'll be squished right up against each other. Your design needs space to breathe.
The Fix: Use the "Gap" setting on the container itself to apply even spacing between everything inside it. If you need more granular control, you can apply "Margins" to individual elements to push them away from their neighbors.
3. The Mystery of the Un-Stretched Element
Ever had an element that just refuses to expand and fill the space you want it to? This is almost always a problem with its parent container's settings.
The Fix: First, check the element itself. If "Fit width to content" is checked, it will only ever be as wide as the text or image inside. Uncheck that. Then, check its parent container to make sure it's set up to allow its children to stretch.
The only way to truly get the hang of the Responsive Engine is to get your hands dirty. Start small. Build a simple login screen or a contact page using nested containers. That hands-on practice is the fastest way to get comfortable with the most critical design feature in the Bubble app builder.
Structuring Your Database and Building Workflows
Let's get into the heart of your application: the database and the workflows. These are the engine and the brain of your app, and I can't stress this enough—a poorly planned database is the number one reason I see Bubble apps fail. It leads to performance nightmares and endless headaches down the road.
The good news? You don't need a computer science degree to get this right. Thinking clearly from the start is what matters.
Think of your database as a smart filing cabinet. It's where every piece of information your app needs is stored and organized. In Bubble, we do this using Data Types.
Defining Your Data Foundation
A Data Type is just a label for a category of things, like a ‘User,’ a ‘Project,’ or an ‘Invoice.’ Simple. For each Data Type, you then create fields to hold the specific details. A ‘User’ Data Type, for instance, would have fields for their ‘email’ (a text field), ‘name’ (another text field), and maybe ‘is subscribed’ (a yes/no field).
Let’s stick with a classic example: a simple task management app. Here’s how I’d start mapping out the data:
Data Type: User
Fields: name (text), email (text), profile picture (image)
Data Type: Project
Fields: title (text), description (text), due date (date)
Data Type: Task
Fields: name (text), status (text - e.g., "To-Do," "Done"), project (Project)
The real magic happens when you link these Data Types together. Notice that last field on the ‘Task’? It’s not a text field; its type is ‘Project.’ By doing this, you're creating a direct relationship. Now, every single task must belong to a project. This relational database structure is what lets you build surprisingly complex features without ever touching code.
This kind of structured thinking applies to your app's logic just as much as it does to its visual design.
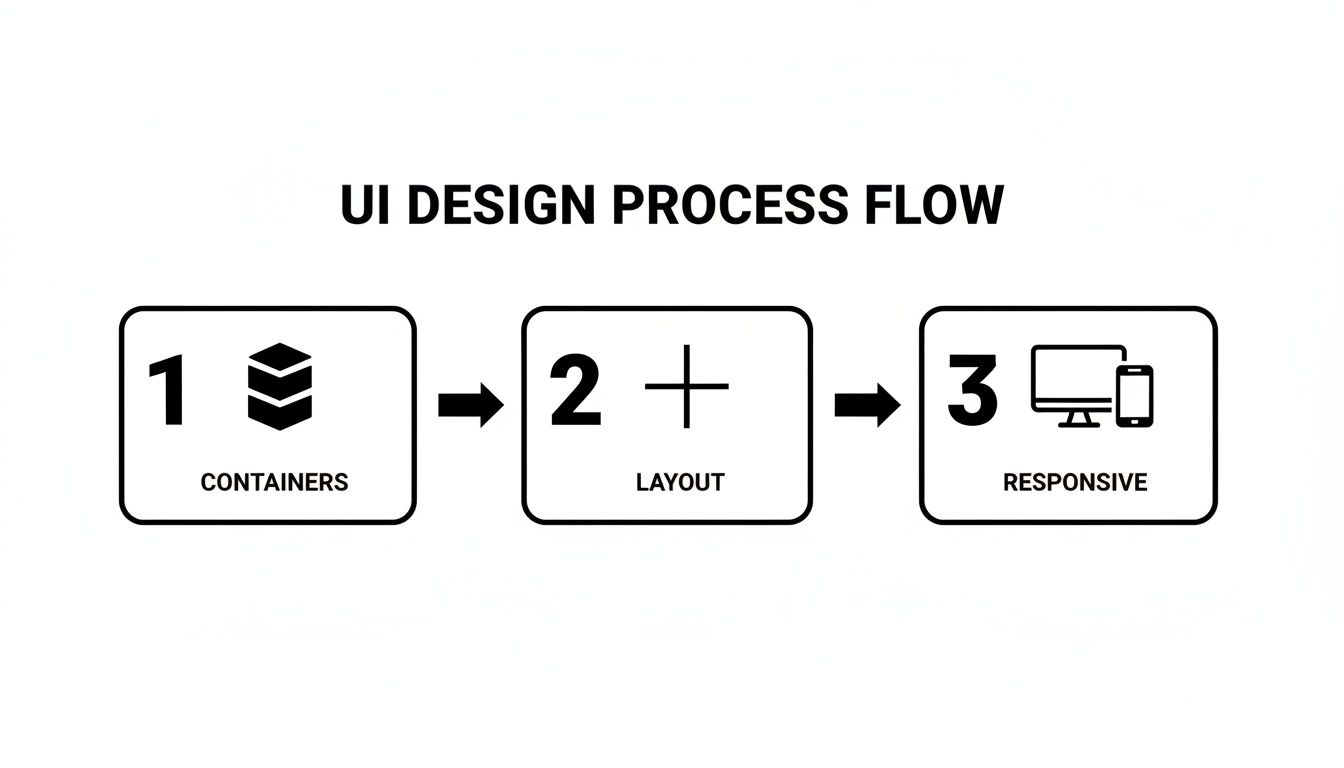
Just as the UI flow moves from containers to layout to responsiveness, your app's logic needs a solid foundation before you start building complex actions.
Bringing Your App to Life with Workflows
If the database is your app’s memory, then workflows are its brain—they’re what make things happen. A workflow is just a series of actions that kicks off when an event occurs. An event can be anything: a user clicking a button, a page finishing its load, or even a specific time of day.
When an event happens, you tell Bubble exactly what to do, step by step.
A common mistake I see is trying to cram too much into one workflow. A great workflow does one job and does it well. Overloading them makes your app slow, buggy, and a nightmare to debug later on.
The classic user sign-up is a perfect example of data and workflows in action. The event is "When Button 'Sign Up' is clicked." From there, you'd chain together a few actions:
Action 1: Sign the user up. This built-in action takes the values from the email and password inputs and creates a new entry in your 'User' Data Type.
Action 2: Make changes to the new User. Right after the account is made, you'll want to save other details, like the name they entered in the form.
Action 3: Navigate to another page. Once the user is created and their data is saved, you’ll send them off to their dashboard or a welcome page.
This simple "event -> actions" model is the foundation for everything you'll build. You can also add conditionals to your actions. This means an action will run "Only when..." a certain condition is true. For example, you might only navigate a user to the premium dashboard "Only when Current User's subscription is 'Pro'."
Thinking about the key workflow automation benefits can give you a better perspective on how to design logic that truly helps your users. You're not just making buttons work; you're building systems that save people time and effort.
Mastering these concepts—clean data types, logical relationships, and event-driven workflows—is how you’ll turn a static design mockup into a living, breathing web application.
Integrating APIs and Expanding Functionality
A truly powerful app rarely lives on an island. It needs to connect to the outside world to pull in data or perform tasks, and that's where APIs become your best friend. Mastering them is how you transform a simple MVP into a dynamic, business-ready tool.
The easiest way to think of an API (Application Programming Interface) is like a specialized messenger. Your app needs something it doesn't have—say, a user's shipping address or the ability to process a credit card. It sends a request via the API to another service, and the API brings back exactly what was needed.
In Bubble, your go-to tool for this is the API Connector. It's a free, built-in plugin that lets you configure these requests to almost any third-party service out there. It’s what lets your app do things far beyond its core features.
Your First API Call
The best way to get your feet wet with APIs is to start with something simple that doesn't require complicated security. Let's try pulling in some public data, like cryptocurrency prices.
Many services offer free, open APIs for this. Here’s how you’d typically approach it in Bubble:
First, you'll need to head over to the Plugins tab and install the API Connector if it isn't already there.
Once installed, you'll add a new API configuration. You could name it something descriptive, like "Crypto Data."
The service provider will give you an API URL. You’ll set this up as a "GET" call, which simply means you're getting information.
Finally, you'll "Initialize" the call. Bubble sends a test request, and if it's successful, it automatically maps out the data structure it receives (like "price" or "market_cap"), making it available to your app.
Just like that, you can use this API call as a data source anywhere. You could show Bitcoin’s current price in a text box or create a list of the top 10 cryptocurrencies with live pricing. This one simple skill opens up a new universe of possibilities.
Advanced Integrations for Real-World Apps
Fetching public data is a great start, but the real magic happens when you integrate services that perform actions. This usually involves more secure authentication using an API key—a unique secret code that proves your app has permission to make requests on your behalf.
Here are a few essential integrations you'll almost certainly encounter:
Stripe for Payments: This is non-negotiable for most business apps. You'll connect to Stripe’s API to create customers, manage subscriptions, and handle payments. When a user clicks "Buy," your app triggers a workflow that sends a "create checkout session" request directly to Stripe.
Twilio for SMS: Need to send order confirmations or two-factor authentication codes? The Twilio API lets your app send and receive texts programmatically. A workflow can trigger a call to Twilio with the user's phone number and your message.
Zapier for Everything Else: Zapier acts as a universal adapter, connecting Bubble to thousands of other apps. You can set up a workflow where adding a new user in Bubble automatically adds them to a Mailchimp list or creates a new row in a Google Sheet.
The API Connector is the bridge between what you can build inside Bubble and the infinite functionality available across the web. It's the skill that allows a no-code app to stand shoulder-to-shoulder with traditionally coded products.
The data shows just how deep Bubble developers go. The average visit duration to the platform is a massive 12 minutes and 30 seconds, with users checking out an average of 24.5 pages per visit. People aren't just poking around; they're deeply engaged in building complex features like API integrations. You can see more stats on Bubble's incredible user engagement to understand why mastering these connections is so critical.
Testing Deployment and Planning Your Next Steps
You've designed the interface, set up your database, and wired up all the logic. It feels like the hard part is over, but now comes the moment of truth: testing. This isn't just a quick check for obvious bugs. It's about making sure the app you've poured your energy into actually delivers on its promise.
Your goal here is to be your own worst user. Try to break things. Click every button, fill out every form (and leave some blank), and follow every possible path a user might take. Does your signup flow work every time? If a user tries to create a project, can they add tasks to it just as you intended? You need to document every hiccup, no matter how tiny it seems.
Mastering Bubble’s Debugger
Your secret weapon for this phase is the built-in Bubble debugger. It’s an absolute game-changer. By running your app in "Debug Mode," you can literally watch your workflows execute step-by-step.
Let's say a user's profile information isn't saving correctly after they sign up. The debugger will show you exactly what data the workflow is trying to process at each stage. You'll see precisely what information it's attempting to write to the database, which usually reveals the problem in seconds. It's an indispensable tool for uncovering those sneaky issues that don't have an obvious cause.
Don't forget about your responsive design, either. This is a huge one that trips up a lot of first-time builders. Use your browser's developer tools to see how your app looks on different devices.
Does the layout reflow properly on a phone?
Are any buttons or text fields overlapping or getting cut off?
Is the navigation still easy to use on a small touchscreen?
Many people forget this step, and it's one of the quickest ways to alienate your users. A huge chunk of your audience will likely be on mobile, and a broken mobile experience is a dead end.
Deploying Your App to the World
Once you've hunted down the major bugs and feel good about your MVP, it’s time to deploy. The process is refreshingly simple. In the Bubble app builder, you've been working in the "development" version. Deploying just means pushing the current state of your app to the "live" environment.
With a single click, your project goes from a private workspace to a public-facing product. Bubble takes care of all the behind-the-scenes server management, freeing you up to focus on your app, not the infrastructure.
After deploying, you’ll want to connect a custom domain to give your app a professional polish. You can manage this right in your app's settings, and it usually just means updating a few records with your domain registrar.
Life After Launch: Planning for V2
Getting your MVP live isn't the finish line; it’s the starting line. Now the real work begins. You'll start getting feedback from actual users, and that feedback is pure gold. It will tell you which features people love, where they're getting stuck, and what you should focus on next.
From here, it's all about iteration. You’ll prioritize feature requests, fix any new bugs that pop up, and start planning for your V2. This cycle of building, testing, deploying, and listening to users is the heartbeat of any successful product.
Think about it: platforms like Bubble are allowing founders—the very same people who turn to services like Codeless Coach for guidance—to get an MVP into the market in weeks, not months. You can learn more about Bubble's explosive growth and impact to see just how many creators are being empowered. With your app now live, you're officially one of them.
Answering Your Top Questions
When you're first diving into the bubble app builder, a couple of big questions always come up. I've heard them from countless builders over the years.
Let's tackle the big one first: Can a Bubble app actually scale? The short answer is a definite yes. Bubble is absolutely built to grow with you, handling more users and larger amounts of data as your app takes off. The key, though, isn't in Bubble itself, but in how you build. A smart, efficient database design is non-negotiable for scaling successfully.
That brings us to the next logical question: performance. Will a Bubble app feel slow? It’s true that it won't be as lightning-fast as an app built with native code—that’s just the nature of the platform. However, a well-built Bubble app can be surprisingly quick and responsive. It all comes down to building efficiently, like optimizing your database queries and keeping your workflows lean.
If you find yourself hitting a performance wall or just want to make sure you're building on a solid foundation, getting some expert guidance can make all the difference. For more specific advice on troubleshooting these common hurdles, you can get targeted Bubble.io help to polish your app and keep your users happy.


