
Mar 27, 2026
Create Your Own CRM System With This No-Code Guide
Tired of expensive CRMs? Learn to create your own CRM system using no-code tools like Bubble. A practical guide for founders to build a custom solution.

What if you could build a CRM that works exactly the way your business does? With no-code platforms like Bubble, you can design a custom CRM that fits your processes like a glove. This isn't about building a massive, enterprise-level system overnight; it's about creating a lean, effective Minimum Viable Product (MVP) CRM—often for under $100 a month—that gives you total control.
Why Build a Custom CRM Instead of Buying One?
I've talked with countless founders who feel boxed in by their CRMs. They’re paying steep monthly fees for a system that's either bafflingly complex or frustratingly basic. It's a classic case of trying to fit a square peg into a round hole, with a tool full of features they don't use while lacking the specific ones they desperately need.

This frustration is widespread in a market that hit $101.4 billion in 2024. Despite the massive spending, almost half of all companies (47%) are unhappy with the rigidity of off-the-shelf options. For smaller businesses, a DIY approach can slash costs by as much as 70% while creating a perfectly tailored system.
Here's a quick look at how a standard CRM compares to building your own with no-code tools.
Aspect | Off-the-Shelf CRM (e.g., Salesforce, HubSpot) | Custom No-Code CRM (e.g., Built on Bubble) |
|---|---|---|
Customization | Limited to pre-set configurations and modules. | Fully customizable workflows, data fields, and UI. |
Cost Structure | Per-user monthly fees that scale with your team. | Fixed platform costs; scales with usage, not seats. |
Feature Set | Often bloated with features you don't need or use. | Built lean with only the features you define. |
Data Ownership | Your data is on their platform, which can lead to vendor lock-in. | You own the database and control your data architecture. |
Time to Value | Quick initial setup, but long adaptation period. | Slower initial build, but immediate process alignment. |
Scalability | Scales easily but can become very expensive. | Scales with your business needs; you add features as you grow. |
Building your own CRM puts you in the driver's seat, allowing you to create a tool that's an asset, not just another monthly expense.
Take Control of Your Sales Process
The real magic of building your own CRM is achieving perfect alignment. Instead of bending your sales process to fit the software, the software is built to mirror your unique, proven process. This is the core advantage for founders using low-code and no-code tools.
This means you can finally:
Design Custom Pipelines: Forget generic stages. Build a pipeline that reflects how your team actually moves a lead from initial contact to a closed deal.
Track What Matters: You decide which data points are crucial. No more sifting through dozens of irrelevant fields to find what you need.
Own Your Data: Your customer list is one of your most valuable assets. Keep it in a system you control, free from vendor lock-in and the headache of future migrations.
Of course, before diving in, it's wise to understand the trade-offs. Weighing custom software vs off-the-shelf software is a critical step in making the right call for your business.
Build a Strategic Asset, Not an Expense
Think about it this way: an off-the-shelf CRM is a line item, an operational expense that recurs every month. A custom-built CRM, on the other hand, is a strategic asset that appreciates in value as your business grows with it.
Building your own CRM is less about saving a few dollars and more about creating a competitive advantage. You get to decide exactly how your customer data is managed, how workflows are automated, and how the system evolves.
Using a platform like Bubble, you’re not just cobbling together an app; you’re engineering your engine for growth. You can start small with a focused MVP—maybe just for lead tracking—and then layer on new features like deal management or automated follow-ups as you clarify your needs. This iterative method ensures your CRM stays lean and perfectly tuned to your business at every stage.
Defining Your Core CRM Features in One Hour
Before you even think about opening Bubble, we need to have a serious talk about focus. I’ve seen countless founders get excited about the idea of a custom CRM, dive straight into building, and end up with a bloated, half-finished mess that does nothing well. This is feature creep, and it’s the number one killer of no-code projects.
To sidestep that landmine, we’re going to run a focused, one-hour planning sprint. Forget designing the entire system. Our only goal is to define the absolute, non-negotiable core of your Minimum Viable Product (MVP). Grab a notebook or a blank doc. This single hour will save you weeks of frustration down the road.
Find Your "One Thing"
Every great, custom-built tool starts by solving one painful problem exceptionally well. So, what’s the single biggest bottleneck in your business right now? Don't get distracted by what you think a CRM should do. Focus on what your business desperately needs.
For most founders, especially in service businesses or early-stage startups, this "one thing" is usually one of the following:
Lead Management: Just getting a handle on new inquiries from your website and tracking those first few conversations.
Sales Pipeline Tracking: Creating a visual way to manage deals as they move from "New Lead" to "Proposal Sent" and finally to "Won" or "Lost."
Client Project Management: Organizing the chaos of tasks and deliverables after you’ve closed a deal.
Contact & Relationship Nurturing: Building a clean, simple source of truth for all your contacts and the important interactions you’ve had with them.
You have to pick one. Seriously, just one. If you’re constantly losing track of potential sales, your "one thing" is the sales pipeline. If you're drowning in client emails about project status, it's project management. This singular focus is the bedrock of your entire MVP.
Don't try to build Salesforce on day one. Your MVP should be a sharp, effective tool that solves your most expensive problem. Everything else is just noise for now.
Map the Critical User Journey
Once you’ve locked in your "one thing," it's time to trace the exact path someone (most likely you) will take to solve that problem using your new tool. This isn’t a technical diagram; it's a simple, step-by-step story of how work gets done.
Let's stick with a classic scenario: your "one thing" is tracking sales leads. The critical journey might look something like this:
Capture a Lead: A prospect fills out the contact form on your website.
Create a Deal: That submission automatically pops up as a new "Deal" in your CRM.
Assign a Task: A task, "Send initial email," is instantly created and assigned to you for that Deal.
Log an Interaction: You fire off the email and make a quick note on the Deal's record.
Move the Deal: The lead replies with interest, so you drag the Deal card from "New Lead" to "Contacted."
Close the Deal: After some back-and-forth, you move the Deal to the "Won" column. Cha-ching.
This simple, six-step journey is your blueprint. It tells you exactly what you must build versus what you can ignore.
Separate Must-Haves from Nice-to-Haves
With that journey mapped out, we can now pull out our MVP feature list. This is where you get ruthless. It's the most critical defense against scope creep when you finally create your own crm system.
Must-Have Features (For our Sales Pipeline MVP)
A database for Contacts (Name, Email, Company).
A database for Deals (linked to a Contact, with a monetary Value and current Stage).
A visual Kanban board to drag and drop Deals between stages.
A simple way to create and view Tasks (linked to a Deal, with a Due Date).
A web form to capture new leads that automatically creates a Contact and a Deal.
That’s it. That is the entire list for version one.
What about flashy reporting dashboards, automated email sequences, or invoicing? Those are "nice-to-haves." You will be tempted to add them. Don't. Add them later, after the core system is actually working and proving its value every single day.
Designing Your No-Code CRM Database
Alright, we're moving from sketches and ideas to the digital skeleton of your CRM. This next part is all about structuring your data. Don't let the word "database" intimidate you; it's really just about creating a smart, organized system for all your information.
Think of it this way: you wouldn't just throw all your business cards, invoices, and sticky notes into a single box. You'd have separate folders. In a no-code tool like Bubble, we create these "folders" by setting up what are called Data Types.
A Data Type is just a bucket for a specific category of information. We're going to start with three essential buckets: Contacts, Deals, and Tasks. Honestly, getting this database structure right from the beginning is one of the most critical parts of the process when you create your own CRM system. Everything else you build will sit on top of this foundation.
The concept map below is a great reminder of how all that initial thinking—your core focus, the user's path, and your rough sketches—directly feeds into what we're about to build.
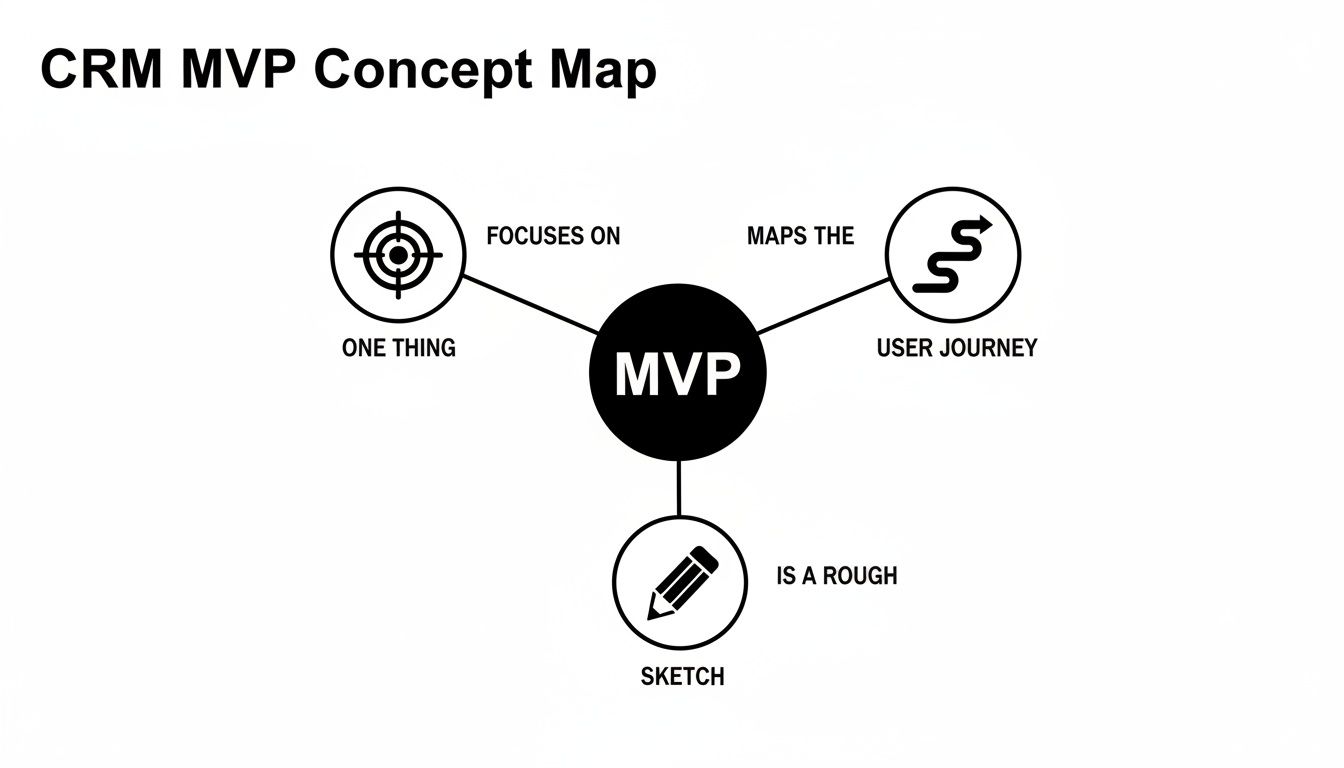
This visual shows that we're not just creating data tables for the sake of it. We're building a structure with a clear purpose, directly tied to the problem you decided to solve.
The Three Core Data Types
Let’s get our hands dirty and define those main "buckets" for your CRM. Inside your Bubble editor, you'll go to the 'Data' tab and create three new types. Each one will hold specific pieces of information, which Bubble calls fields.
Contacts: This is your central address book. It’s the home for every single person you do business with, from a brand-new lead to your most loyal client.
Deals: Think of this as your opportunities pipeline. Every potential project or sale gets its own entry here, letting you track its journey from a simple inquiry to a signed contract.
Tasks: These are the actionable to-do items. Every "Send follow-up email" or "Prepare the proposal" lives here, making sure nothing falls through the cracks.
This simple, three-part setup is the engine behind most powerful CRMs. It provides a clean, organized way to see exactly what's happening in your business, preventing the dreaded information silos that kill productivity.
Defining the Fields for Each Data Type
Now that we have our main buckets, we need to decide what labels to put on the files inside them. These are your fields. My advice? Start lean. You can always add more later, but it’s much harder to remove fields that are already full of data.
For the Contact Data Type:
Name:
(Type: text)- The person's full name.Email:
(Type: text)- Their primary email address.Phone:
(Type: text)- Their main phone number.Company:
(Type: text)- Where they work.Role:
(Type: text)- Their job title.
For the Deal Data Type:
Deal Name:
(Type: text)- Give it a clear name, like "Q3 Marketing Campaign for Acme Inc."Value:
(Type: number)- The potential monetary worth of the deal.Stage:
(Type: text)- Where it is in your sales process (e.g., "Lead In," "Meeting Scheduled," "Proposal Sent").Close Date (Expected):
(Type: date)- Your best guess for when the deal will close.
For the Task Data Type:
Task Name:
(Type: text)- A quick, clear description of the to-do.Due Date:
(Type: date)- The deadline for getting it done.Status:
(Type: text)- Its current state (e.g., "Not Started," "In Progress," "Complete").
Pro Tip: For fields like
StageorStatus, I highly recommend using Bubble's "Option Sets" feature instead of a plaintextfield. This gives you a dropdown of pre-defined choices. It's a lifesaver for keeping your data clean and preventing typos (no more "Proposal Sent" and "Propsal Sent" mucking up your reports).
Creating Relationships Between Your Data
This is where the real power of a CRM comes to life. A list of contacts and a separate list of deals are just two fancy spreadsheets. The magic happens when you connect them.
In Bubble, you build these bridges by creating a new field and setting its Type to be another Data Type you've already made. It’s surprisingly simple.
Link
DealstoContacts: Head to yourDealData Type and add a new field. Call it something likeRelated Contact. For the 'Field type', don't picktextornumber; instead, select yourContactData Type. Just like that, every deal in your system can now be tied directly to a person.Link
TaskstoDeals: Now do the same forTasks. Go to theTaskData Type, create a field namedRelated Deal, and set its 'Field type' toDeal. This ensures every to-do item is connected to a specific opportunity, giving you perfect clarity on what needs to happen next to move a deal forward.
By creating these relationships, you're building a truly "relational" database. This is how you avoid the data chaos that plagues so many companies. It’s staggering that while CRM adoption in mid-sized firms hit 91% by 2024, a whopping 29% still struggle with disconnected data.
Building your own data structure from the ground up solves this problem at its root. In fact, custom-built CRMs have been shown to boost sales rep productivity by a solid 8.71%. If you want to dive deeper into the market trends, Statista's in-depth CRM analysis is a great resource.
Building Your Core CRM Screens and Workflows
With your data model acting as the foundation, it's time for the fun part—building the actual screens and workflows your team will use every day. This is where your CRM stops being a spreadsheet in disguise and starts becoming an interactive tool that actually helps you manage your business.
We're going to piece together the visual elements and then wire them up with logic. If you're using a tool like Bubble, this is all done visually. You’ll be dragging components onto a canvas and then telling them what to do when a user interacts with them.
Creating the Contact Dashboard
First up, you need a central place to see all your contacts. In Bubble, the go-to element for this is the Repeating Group. Just think of it as a smart list that can display every single entry from a table in your database.
Here’s how you'd set one up for your contacts:
First, drag a Repeating Group element onto your page.
Next, you'll tell it what kind of data to show by setting its 'Type of content' to Contact.
Finally, its 'Data source' will be a 'Do a search for Contacts'.
Inside the very first cell of that group, you can add a few text elements to pull data for that specific contact, like the Contact's Name, Email, and Company. Bubble handles the rest, automatically creating a row for every contact in your database. Simple.
Visualizing Your Sales Pipeline with a Kanban Board
A simple list of deals is okay, but a visual pipeline is a true game-changer. Seeing everything laid out on a board gives you that instant, gut-check understanding of your entire sales process. We can build a classic Kanban-style board by laying out a few Repeating Groups side-by-side.
Let's say you've defined your deal stages as "New Lead," "Contact Made," "Proposal Sent," and "Won."
To build the board, you create a separate Repeating Group for each of those stages. The trick is to filter the data source for each one.
The "New Lead" column will search for
Dealswith the constraint:Stage = New Lead.The "Contact Made" column gets its own constraint:
Stage = Contact Made, and you just repeat this for every stage.
Inside each column, you'll design a "card" that shows key deal information, like the Deal's Name and Value. Just like that, you have a crystal-clear view of every deal in your pipeline. Now, let's make it interactive.
Key Insight: When you create your own CRM system, building a pipeline that perfectly mirrors your sales process is a massive win. You're not stuck with someone else's generic stages; you get to define the exact flow that makes sense for how you actually sell.
Powering Your UI with Workflows
Workflows are the brains behind the operation. They're the set of instructions that run when a user does something, like click a button or drag a card. In Bubble, you kick this off by selecting an element on the page and clicking 'Add workflow'.
Let's build two workflows that are absolutely essential for any CRM.
Workflow 1: Creating a New Contact
You'll start with a simple form containing input fields for a contact's name, email, and company, along with a "Save Contact" button.
When a user clicks that button, the workflow is pretty simple:
You'll trigger an action to
Create a new thing...The "thing" you're creating is a
Contact.Then, you map the fields:
Name = Input Name's value,Email = Input Email's value, and so on.As a final touch, you'll add a step to
Reset relevant inputs, which clears the form so it’s ready for the next entry.
You've just built the logic to add new contacts to your database right from the app's interface. For a much deeper look at building out pages and logic, our complete guide on the Bubble app builder is a great resource.
Workflow 2: Drag-and-Drop Pipeline Logic
Making that Kanban board interactive is a slightly more advanced move, but it's incredibly satisfying. You'll likely need a plugin that adds drag-and-drop capabilities to your Repeating Groups.
Once it's installed, you can create a workflow that triggers when a deal card is dropped into a new column. The logic looks something like this:
The workflow starts when a card is dropped. It will then
Make changes to a thing...The "thing" you're changing is the specific
Dealassociated with the card you just dragged.You'll then update one field:
Stage = The stage of the new column(e.g., "Proposal Sent").
That one workflow is all it takes to manage your pipeline visually. When you move a card, you aren't just changing what you see on the screen—you're instantly updating the core data in your database. You could even add another action to automatically send a notification or create a follow-up task.
This is exactly why building your own CRM is so powerful. Research shows that 50% of salespeople miss their quotas without a proper CRM, but a custom-fit system can help lift win rates by 29%. Features like real-time pipeline updates, which you can build yourself, have a direct impact on the bottom line. You can learn more about these trends from Futurum Group's market analysis.
Integrating and Automating Your Custom CRM
Alright, you've built the core of your CRM. It holds your contacts and tracks your deals, which is a huge first step. But right now, it's a bit of a lonely island. To make it truly powerful, you need to connect it to the other tools you rely on every day.
Without integrations, you're stuck manually copying information between your apps. That kind of double-entry work is exactly what we're trying to eliminate. By linking your CRM to other services, you can create automated workflows that save you an incredible amount of time and effort. This is how your CRM goes from being a simple database to the command center of your business.
Let's look at two fantastic, non-technical ways to make this happen: using Bubble's built-in API Connector and a third-party automation tool like Zapier.
Connecting Directly with the API Connector
Think of an API (Application Programming Interface) as a dedicated messenger that lets software programs exchange information directly. Bubble's API Connector is a built-in feature that lets you tap into the APIs of thousands of other web services, creating a solid, direct link between them and your CRM.
Let's imagine a common scenario: you want every new person who signs up for your Mailchimp newsletter to automatically appear as a "Lead" in your CRM.
Instead of a formal step-by-step, here's the gist of how you'd set that up:
First, you'd configure the API Connector inside Bubble to talk to Mailchimp. This usually involves copying an "API Key" from your Mailchimp account and pasting it into Bubble to authorize the connection.
Then, you'd tell Mailchimp to send a notification to a special URL (called a "webhook") every time a new subscriber joins.
Finally, you'd build a workflow in Bubble that "listens" for that notification. When it arrives, it triggers an action to create a new
Contactand fills in their name and email using the data Mailchimp sent over.
It might sound a little technical, but it’s a one-time setup. Once you've built that bridge, it just works, silently and reliably in the background.
My Take: The API Connector is your go-to for core business functions. It's robust, fast, and gives you precise control. Use it for high-volume, critical tasks that form the backbone of your operations.
As your business grows, you'll find more opportunities for these connections. For example, exploring the benefits of a direct CRM and ticketing system integration can completely change how you handle customer support.
Building Quick Automations with Zapier
While the API Connector is perfect for heavy lifting, sometimes you just need to connect two apps quickly without all the setup. This is where a tool like Zapier is an absolute game-changer. It acts as a universal translator, connecting over 6,000 different apps with just a few clicks.
In Zapier, an automation is called a "Zap." Every Zap has two parts: a trigger (the event that kicks things off) and an action (what you want to happen next).
Here's a simple, practical example. Let's say every time you mark a deal as "Won" in your CRM, you want to add a row to a Google Sheet to track your revenue.
Building that Zap would look like this:
Trigger: You'd select your Bubble app and choose the trigger "New 'Won' Deal."
Action: Then you'd select Google Sheets and choose the action "Create Spreadsheet Row."
Mapping: The final step is just matching up the data. You tell Zapier that the
Deal Namefrom Bubble should go into the "Project" column in your sheet,Deal Valuegoes into the "Amount" column, and so on.
You can literally build that automation in under five minutes. It's the perfect way to quickly connect your CRM to other tools like Trello or Slack, letting you test out new workflows and see what sticks without a big time commitment.
Launching and Scaling Your No-Code CRM
You’ve done it. The core features of your custom CRM are built and working, which is a huge accomplishment. But getting to launch isn't just about flipping a switch. You're about to turn this development project into a living, breathing asset for your business.
Now comes the fun part: putting your hard work to the test in the real world. A successful launch starts with making sure your app is as solid as you can make it.
Your Pre-Launch Checklist
Before you push your app live, you need to put on your "new user" hat. Try to forget you know how everything works on the backend and run through a final, rigorous check. The goal here is to spot those confusing workflows or hidden bugs before they become a headache.
User Accounts: Can you actually sign up for a new account? Does the login and logout process work smoothly? And what about the "forgot password" flow? Test it. It’s one of those things that’s easy to forget but critical when you need it.
Core Workflows: Walk through the most important user journey you mapped out. Try to create a new contact from scratch, add a deal associated with them, and then move that deal through the stages of your pipeline.
Data Integrity: Does the information you enter actually save correctly? If you link a task to a specific deal, does that connection still show up when you navigate away and come back?
Responsiveness: Pop open your app on every device you can find. How does it look and feel on your desktop, a tablet, and your phone? A layout that looks perfect on a large monitor can easily break on a smaller screen.
This isn't just a one-and-done task. Think of it as the beginning of your quality control process, something that will become second nature as your application grows.
Deploying to a Live Environment
Once you feel good about your testing, it's time to go live. If you’re using Bubble, this part is refreshingly simple.
You've been building in your "development" version, which is a safe sandbox where you can break things without consequence. Deploying simply means pushing all the changes you’ve made from this sandbox over to the "live" version that your users (or just you, at first) will see.
In Bubble, you just click the "Deployment and version control" button and deploy your current version to live. It’s a single, satisfying click that marks a major milestone.
Your goal isn't a perfect, flawless launch. The real goal is to get a working version 1.0 into use so you can start gathering real-world feedback immediately. Perfection is the enemy of progress.
Gathering Feedback and Iterating
Your CRM is live. So, what’s next? It's time to become your own most active user and toughest critic.
Start using your new CRM for its intended purpose every single day. As you do, keep a dedicated "feedback log." This doesn't need to be fancy; a simple spreadsheet or even a note-taking feature within your new CRM is perfect.
Log everything you notice:
Bugs: Anything that breaks, glitches, or doesn't behave as you'd expect.
Friction Points: Workflows that feel clumsy, confusing, or just take too many clicks.
Feature Ideas: New capabilities you wish you had that would make your work easier.
This log is your treasure map—it’s the roadmap for version 1.1 and beyond. After a week or two of consistent use, review your notes and start prioritizing. Resist the temptation to jump on the newest, shiniest feature idea. Instead, fix the most frustrating bug or streamline the clunkiest workflow first.
This cycle of using, logging feedback, and improving is the secret to scaling a custom app effectively. For a deeper dive into this agile mindset, our guide on what is rapid prototyping offers some great insights.
Building a custom tool from the ground up is incredibly rewarding, but you don’t have to go it alone. If you're ready to accelerate your build and get expert guidance along the way, Codeless Coach offers one-on-one tutoring sessions to help you ship faster and smarter. Book a session at https://codeless.coach.


